Published 20th June 2022
Last time we have built a little React front-end, and we even hooked it into an Express back-end. It is time to continue our work and further develop our calorie tracker application. In order to move on with this article, you will have to clone this repo .
Also, if you'd like to build the whole project from scratch, you can do so by following This link .
With everything out of our way, I invite you to clone the repo above and then while being inside of it, to run:
git reset --hard 65e950e413fa2a46bdfa9db518f3c316889567b6
Now you are at the exact same point in time as before developing any of the features presented in this article.
With the current configuration of the project, for now you will have to cd into the front and back directories and run yarn or the npm install command. After that just start the 2 projects ( yarn start for front and yarn dev for back).
If you hated doing this, let's just automate slightly our project for now. Stop both front and back processed, then cd into the front directory and run:
yarn add concurrently
Once that's done, just add the below line in the scripts 2 blocks of the package.json file:
      "back": "cd ../ && cd back && yarn dev",
      "dev": "concurrently \"yarn back\"  \"yarn start\""
Now, in order to start you project, you need only to cd into the front directory and run yarn dev.
If you remember from last time, when we added a meal item, it would get displayed in the front and sent to the back-end API. What we want is to persist that data inside a MongoDB instance. If you are not familiar with MongoDB, it is a noSQL. database, and we will use their cloud service to store and manipulate our data without the hassle of managing a database on our own machine or server.
In order to get started with mongoDB you need to sign up using this Link . I will not go through all the steps here, you basically have to sign up (you can use a gmail account). Make sure you select the free tier and create a user and a password.
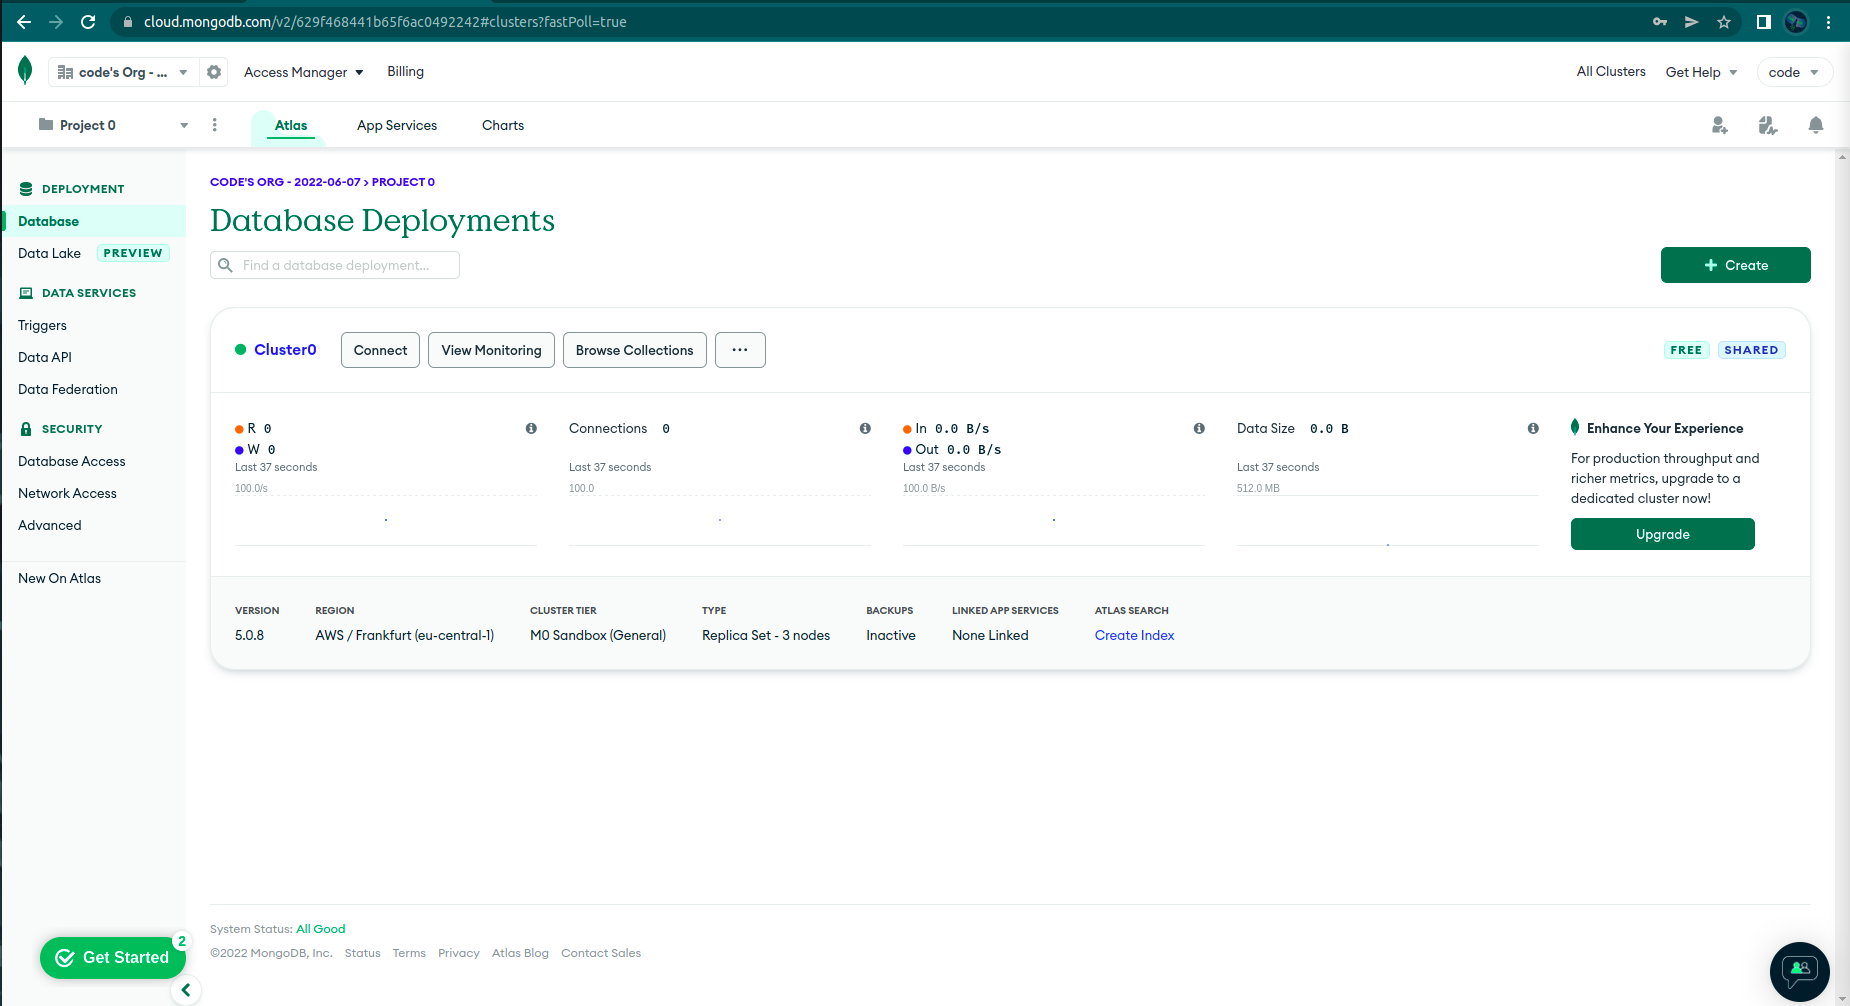
Once you have signed up and are all set, you'll need to create a database cluster. A 'cluster' means multiple databases managed by a single instance of a database server. If you've made it this far, you should see something like this on your screen:
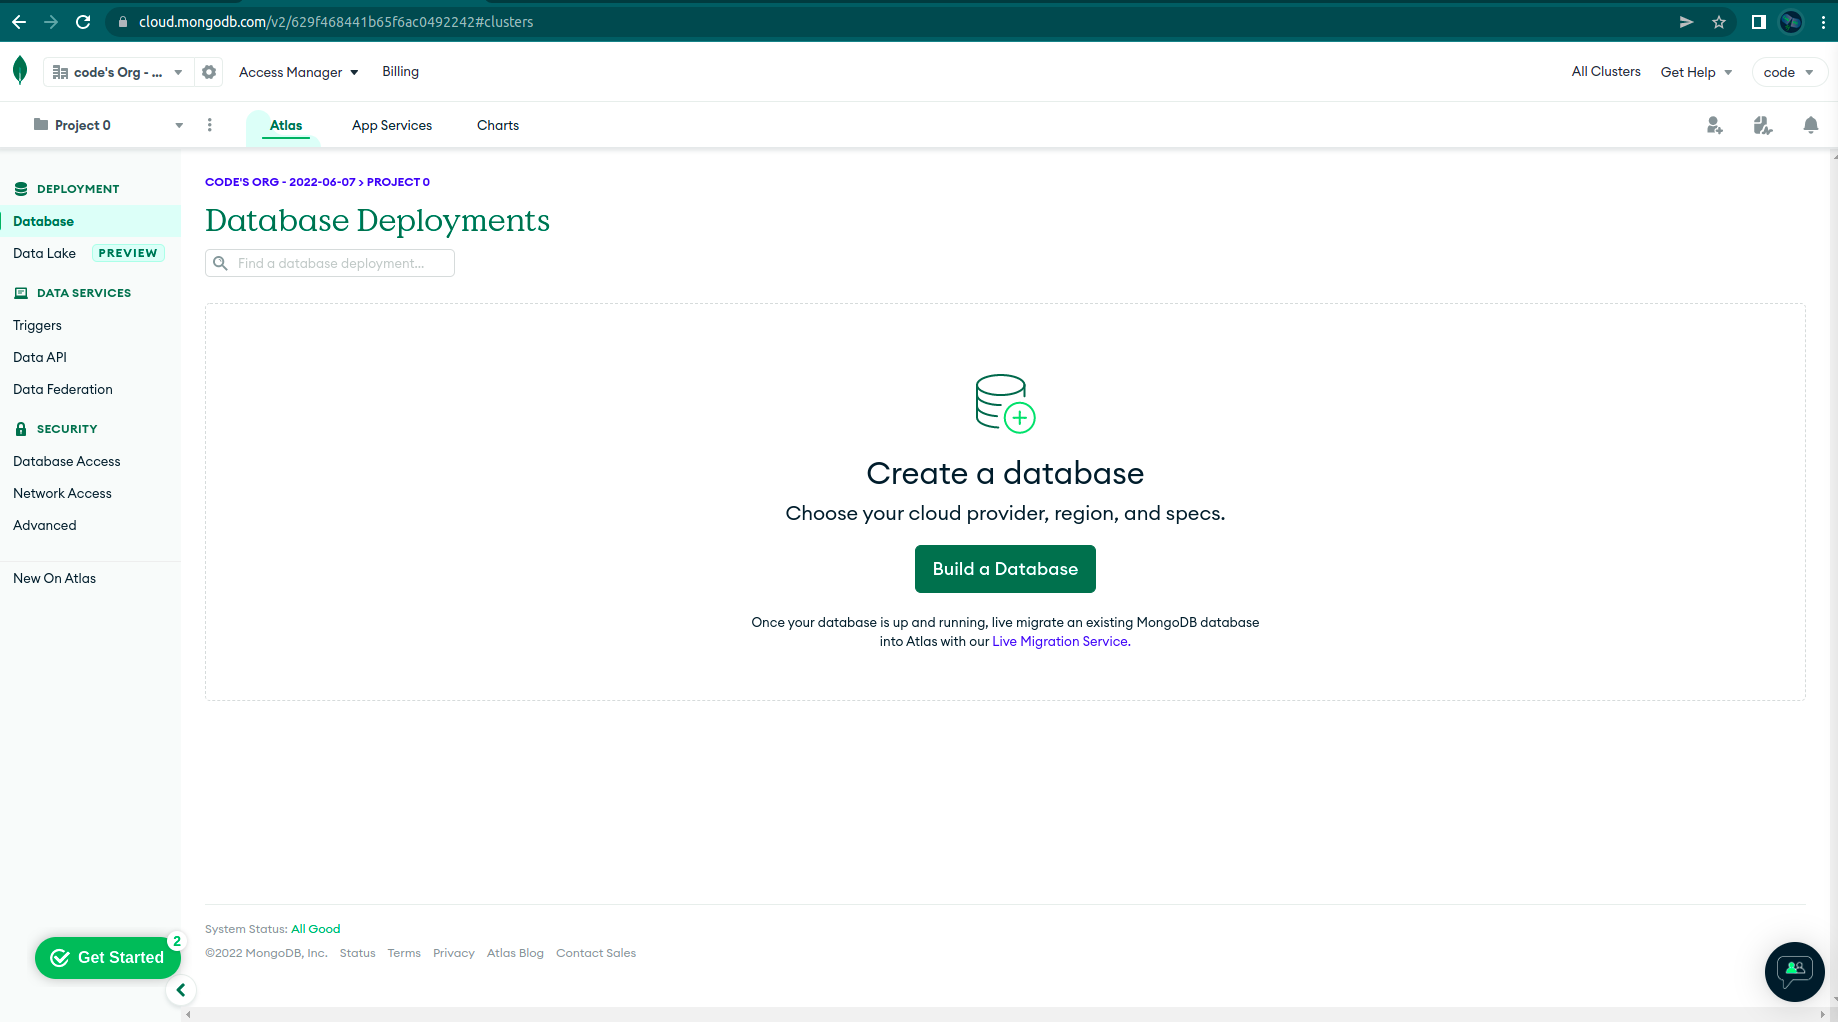
Click on the 'Build a Database' button, and you should see this:
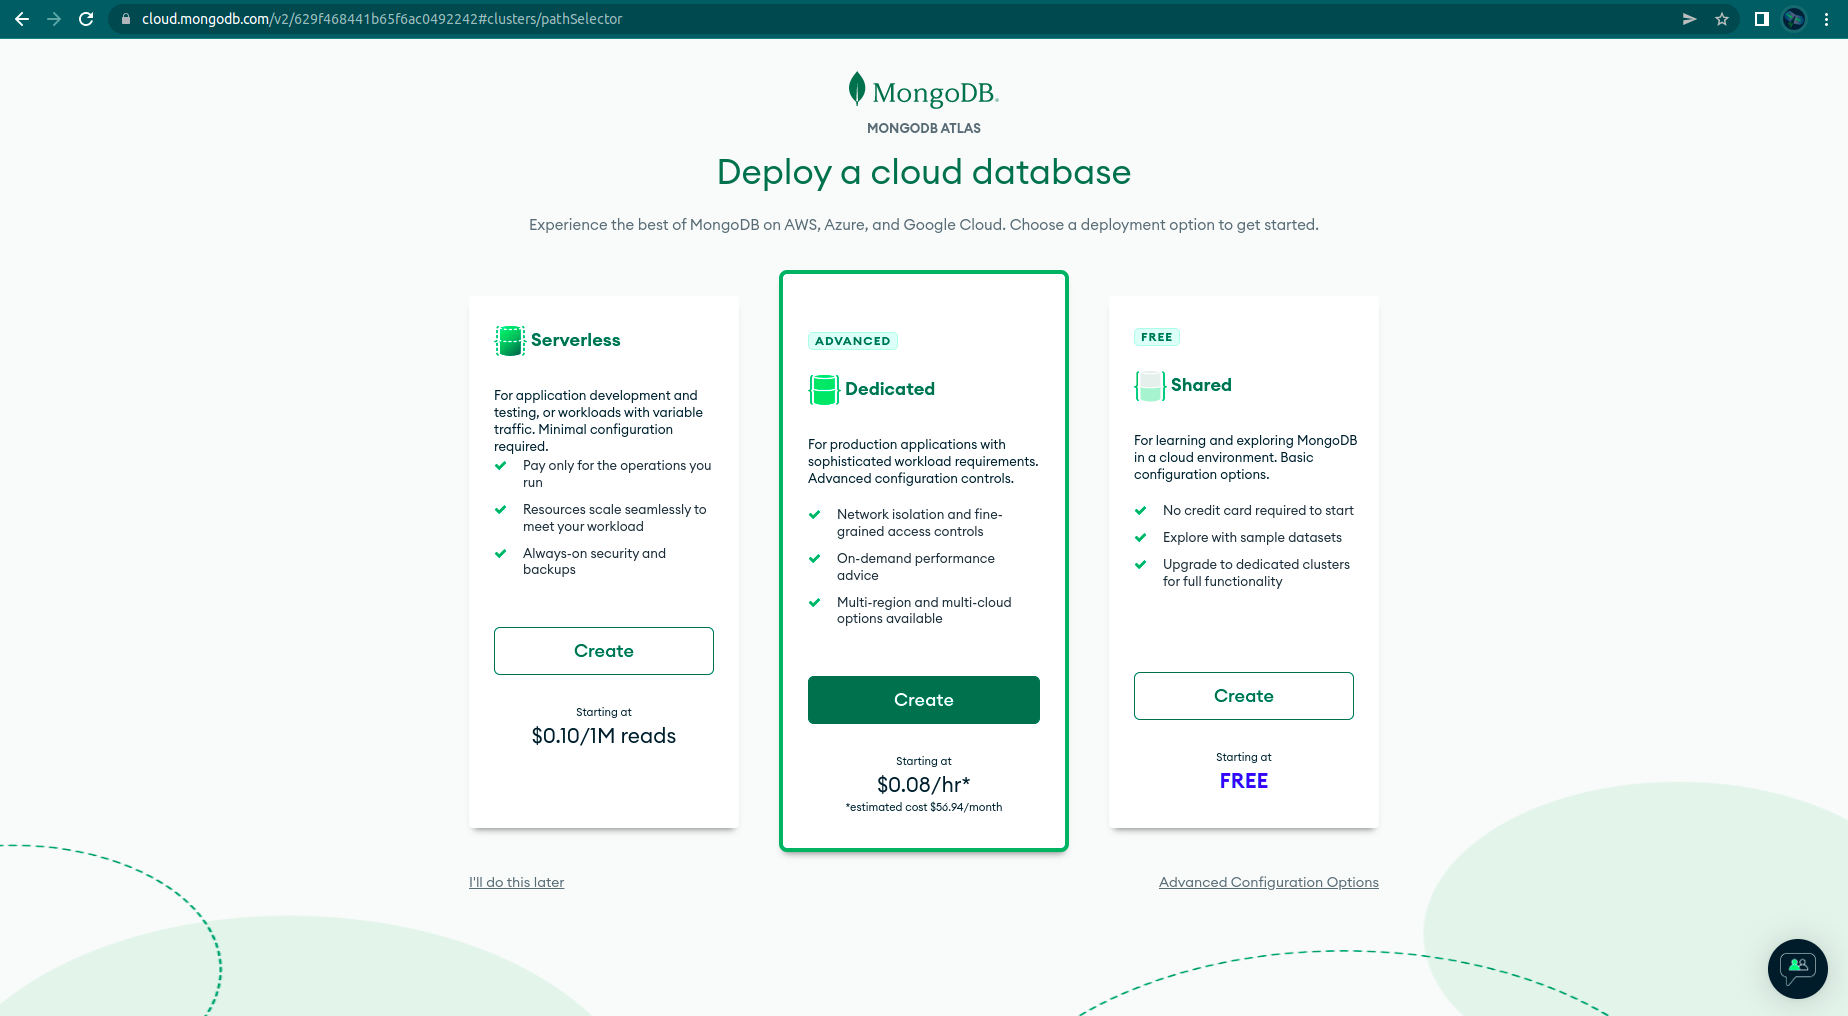
Choose the free one and click 'Create'. Next you will have to select your plan (choose the free one) cloud provider:
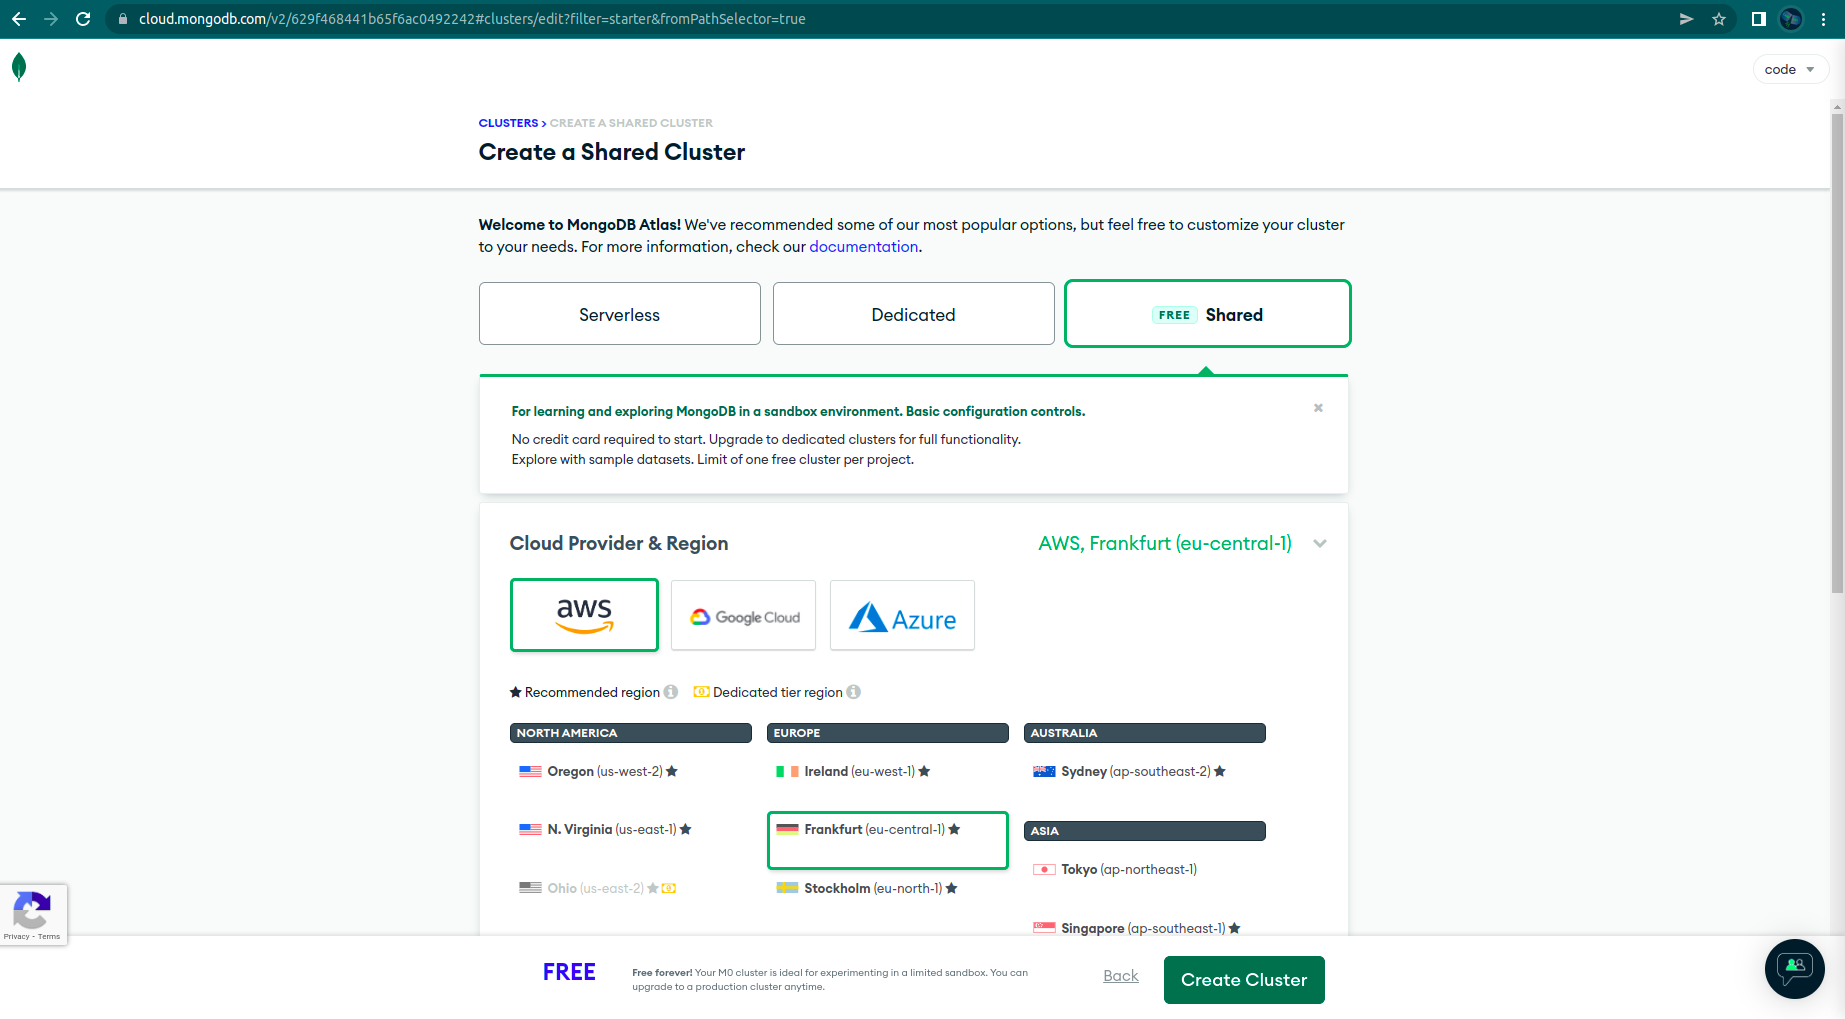
Apart from choosing the free plan, I left the default settings on and now you too just click on 'Create Cluster'.
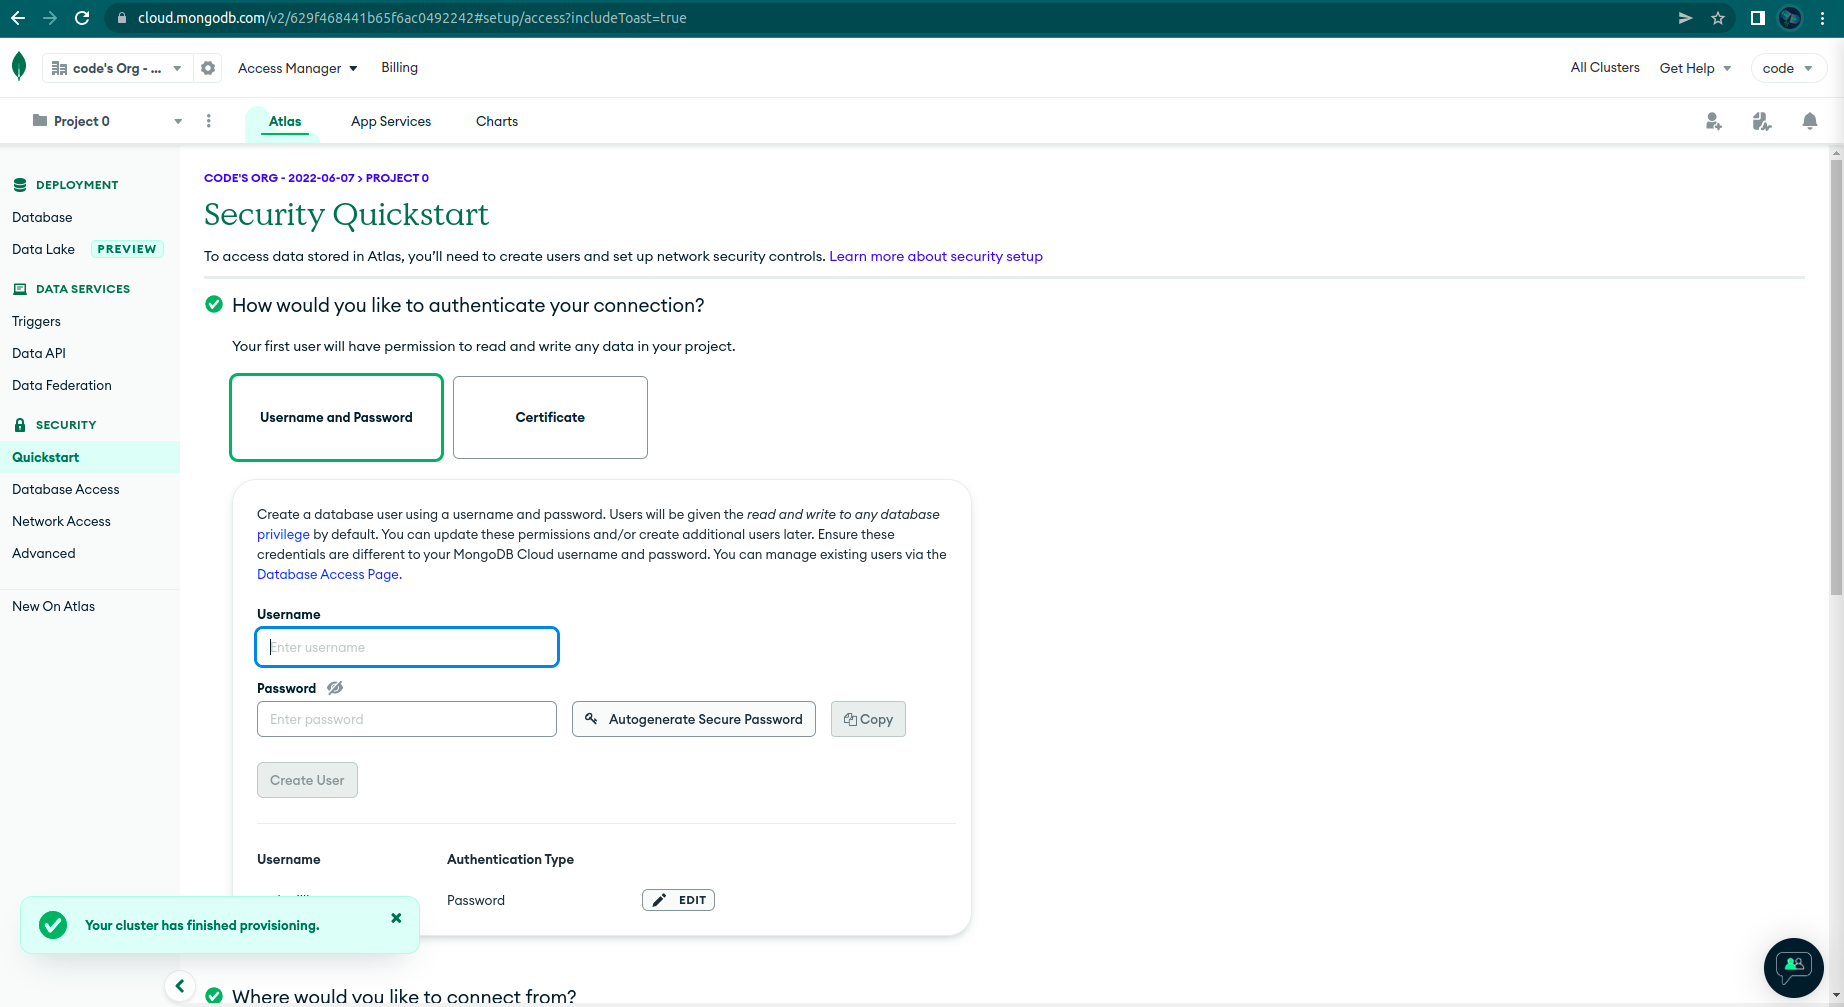
You will be prompted to create a username and password for your cluster. These will be your database credentials:
Now that your username and password are done, your cluster should be created and you should see this:
The final step in order for everything to work, is to whitelist your current IP. In order to do that, click on the 'Network Access' link from the dashboard:
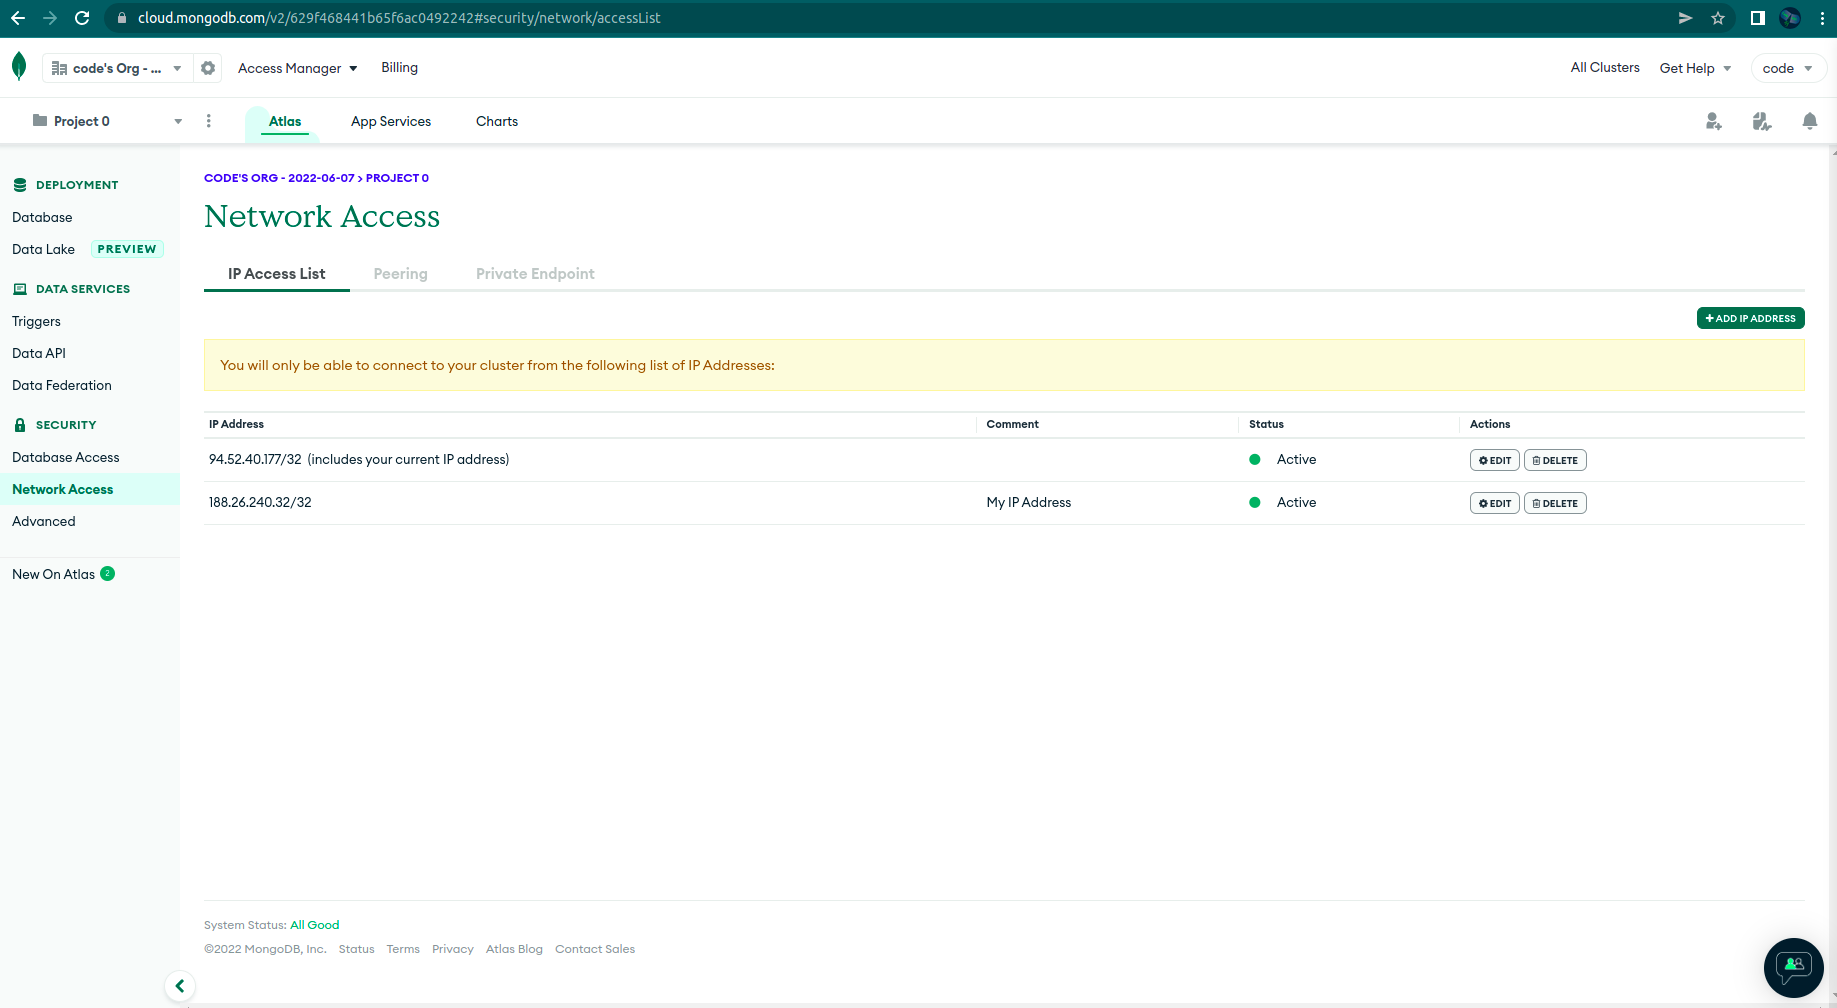
Next, click on 'ADD IP ADDRESS' and add your current IP address. If you want to allow access from any IP, just add 0.0.0.0/0 in the 'Access List Entry field'.
*Note if you don't do this, nothing from the following parts of the article won't work.
From this point on, we can just go back to our code.
Let's start working in the back directory. Create another directory called db. Inside of it, create a db.js file. In a terminal, cd into the back directory and run:
yarn add mongodb
Now, you need to copy your connection string from the mongo dashboard. (picture above). Click on 'connect' and you should see this:
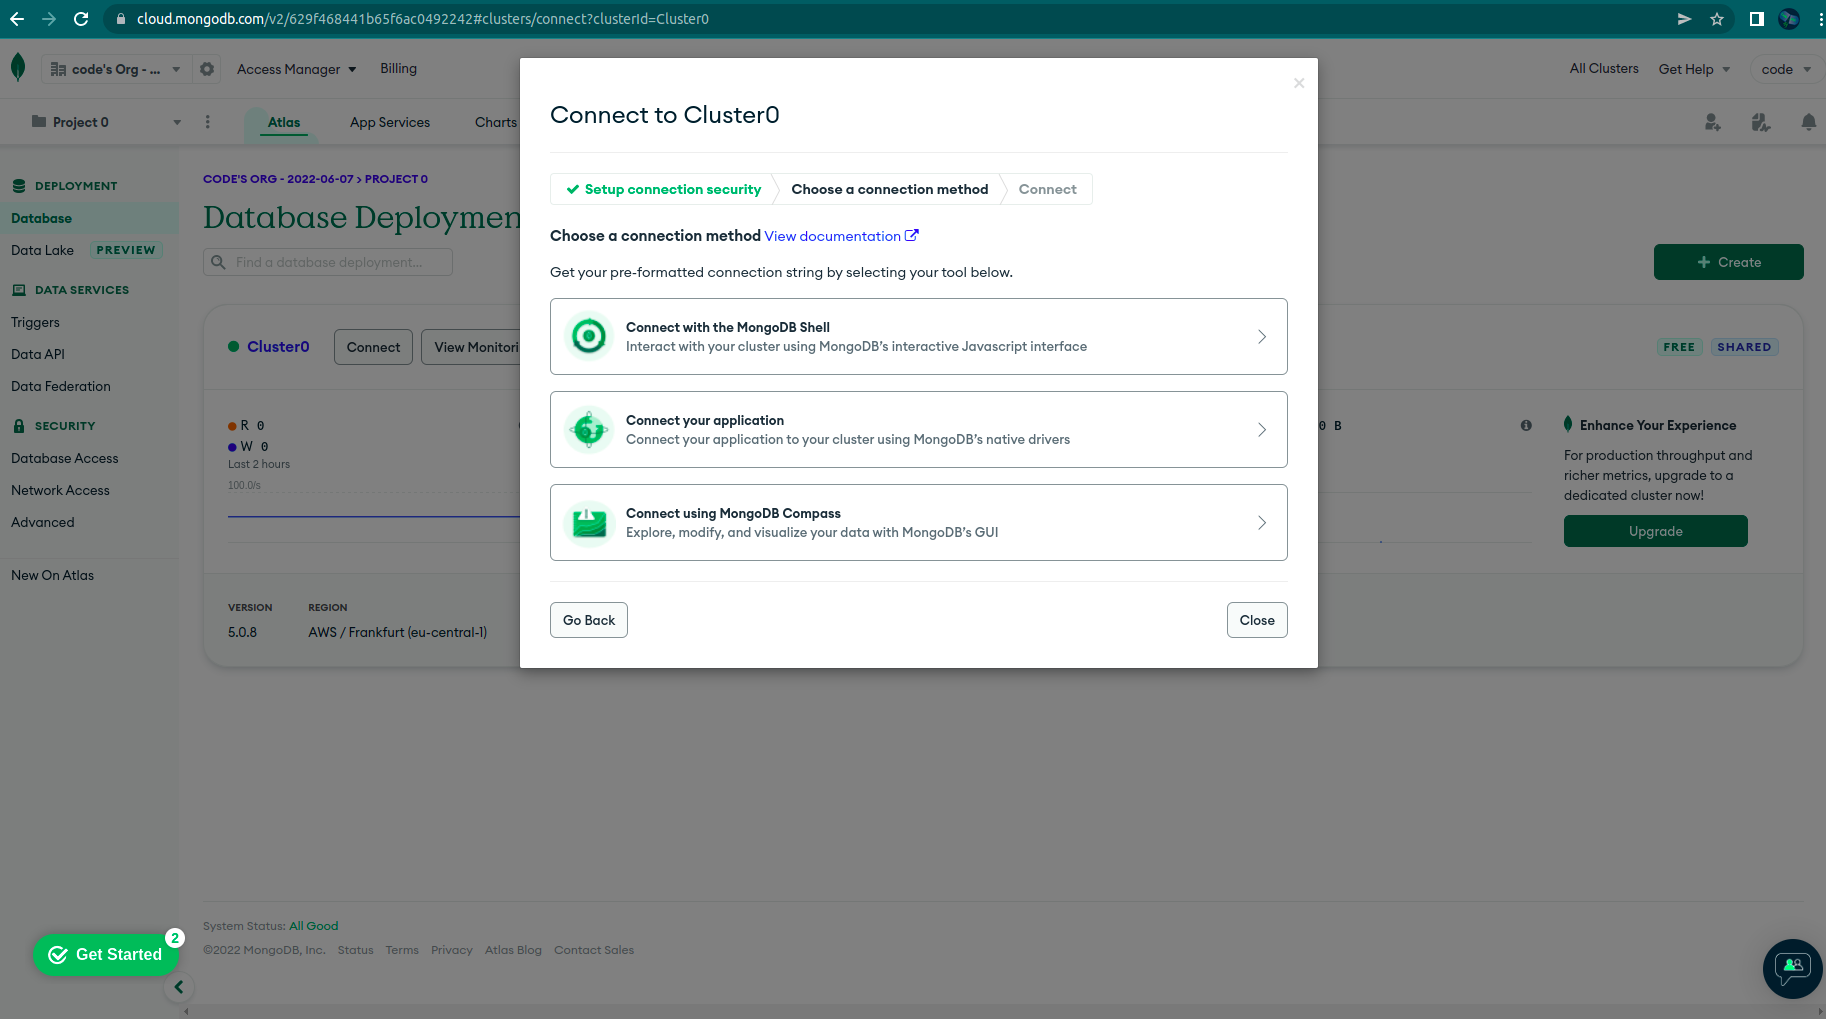
Click on 'Connect your application' and you'll see:
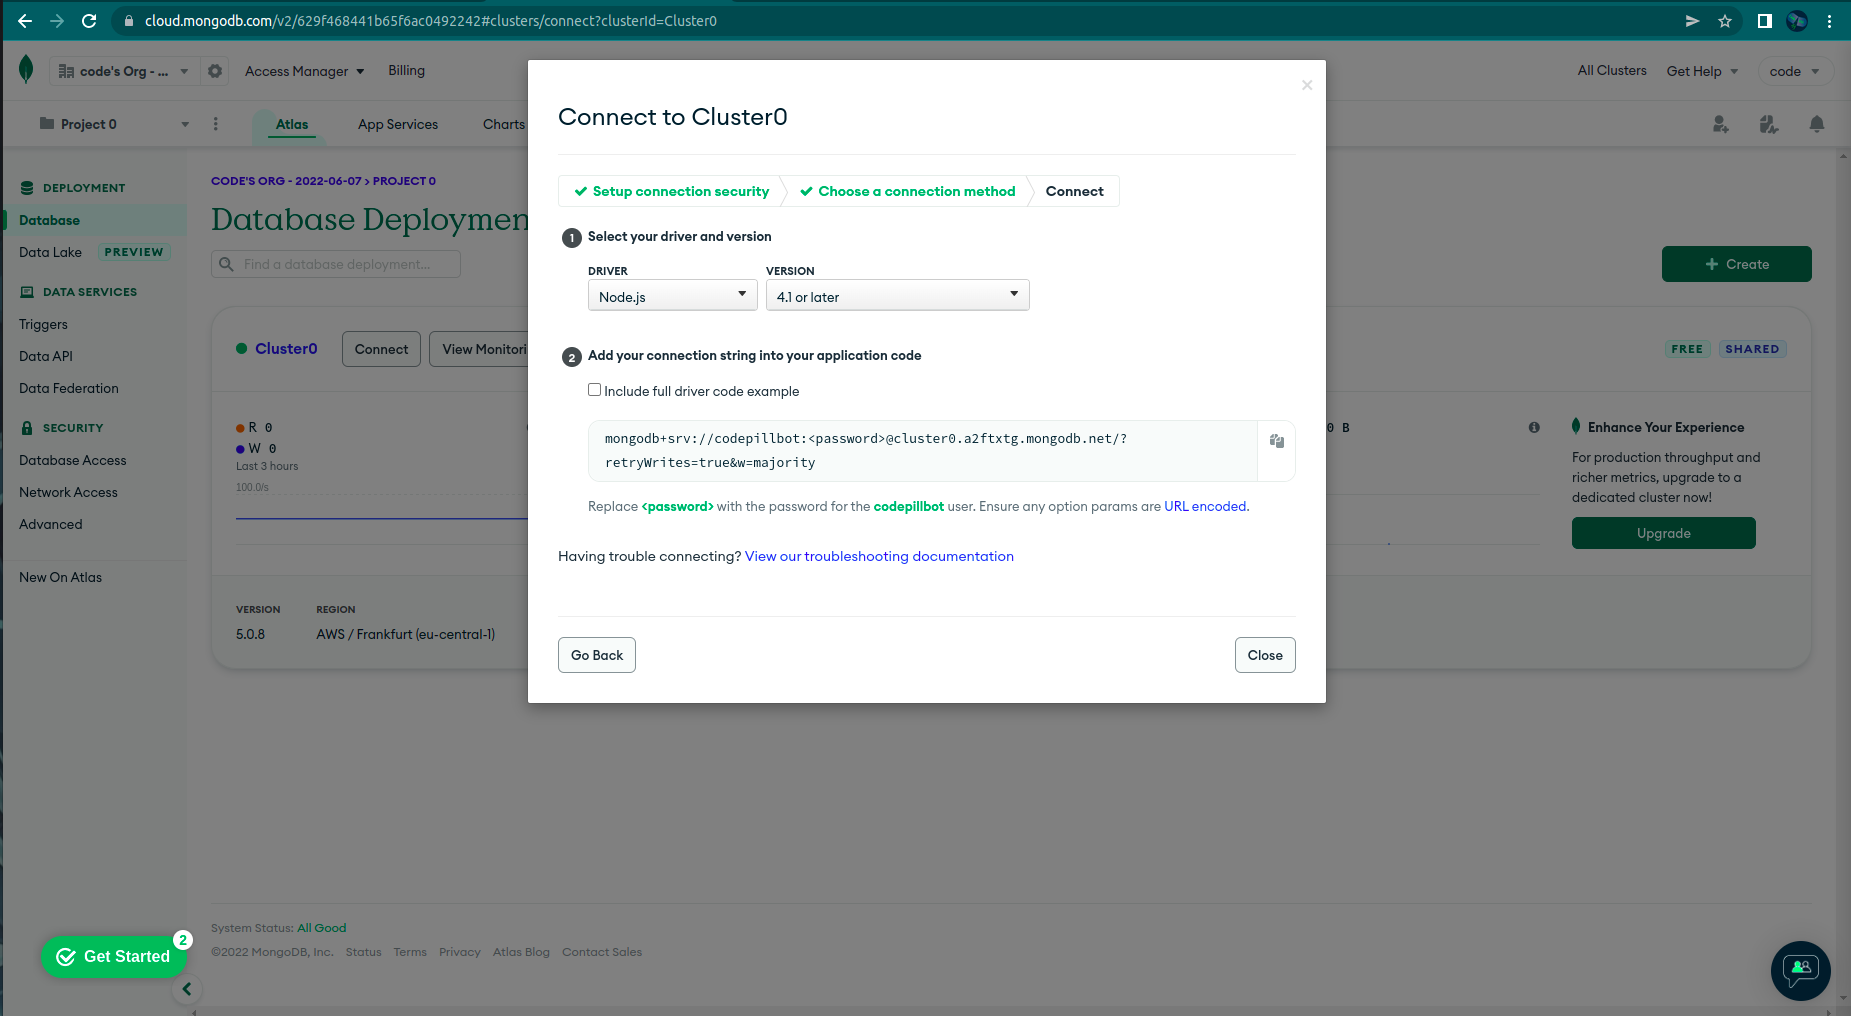
Copy your connection string somewhere and replace the <password> parameter with your actual database password that you set up in the above steps.
In the db.js file paste the below:
      import { MongoClient } from "mongodb";

      export const connectDB = async () => {
        const uri =
        "mongodb+srv://<yourDbUser>:<yourDbPassword>@cluster0.a2ftxtg.mongodb.net/?retryWrites=true&w=majority";
        const client = new MongoClient(uri);
        try {
          await client.connect();

          const databasesList = await client.db().admin().listDatabases();

          console.log("Databases:");
          databasesList.databases.forEach((db) => console.log(` - ${db.name}`));
          console.log(`DB CONNECTED lists here:`);
        } catch (e) {
          console.error(e);
        } finally {
          await client.close();
        }
      };
In the server.js up top, import the connectDB funciton:
import { connectDB } from "./db/db.js";
Next, change the testRoute as per below:
      app.get("/testRoute", async (req, res) => {
        await connectDB();
        return res.end("Test route here...");
      });
Finally, cd into front and run:
yarn dev
Now, in your browser go to http://localhost:4000/testRoute .
You will get the following error in the terminal:
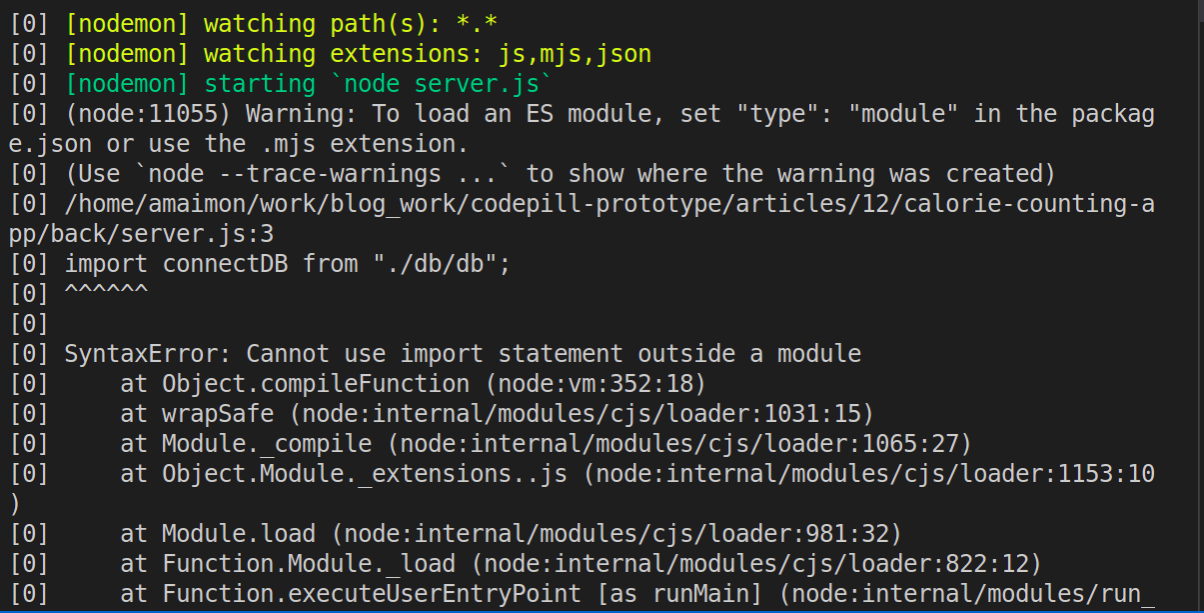
In order to fix this, paste the below line in the package.json file from the 'backend' directory.
"type": "module"
Next, if you'll try running your code again and opening the http://localhost:4000/testRoute route in the browser, you'll get another error (lots of errors here but it's good practice fixing them):
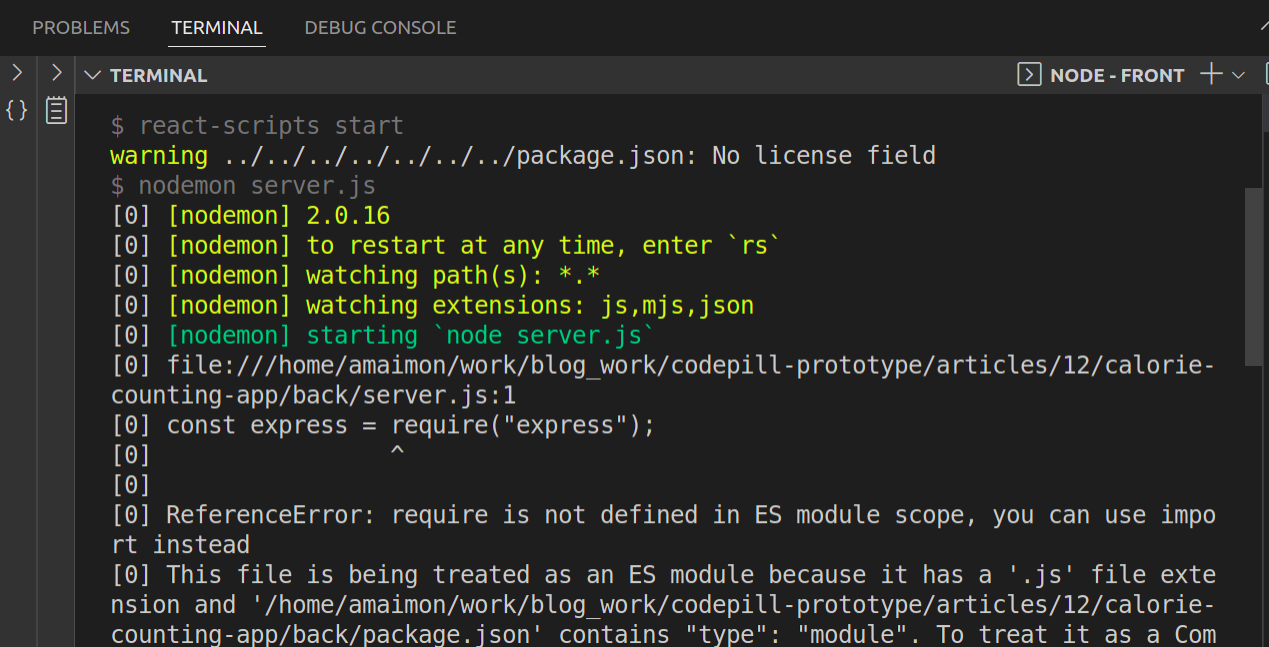
This happens because by adding the type:module directive in the package.json file, we basically tell it not to use commonJS modules (these use 'require') but to use the ES modules (the ones with 'import stuff from 'moduleName').
In order to fix this, just replace the 2 lines requiring express and cors in server.js with:
      import express from "express";
      import cors from "cors";
A final note on 1 more error (I promise I leave you alone for now after this 😂). Depending on how you picked your user and password, if you've got special characters in it like @ or ! you might get this error:

That means that the 'special character' that you've used must be url-encoded and you can read more about that Here .
Finally, when you go now to http://localhost:4000/testRoute , you should see in your terminal the databases listed and by this time you should have 2 'databases' the 'admin' and 'local' ones.
Congratulations, you ve just connected your express back-end to a cloud mongoDB instance. Before moving on, let's move some logic around in the db.js, replace its contents as per below:
import { MongoClient } from "mongodb";

const listDBs = async (client) => {
  const databasesList = await client.db().admin().listDatabases();

  console.log("Databases:");
  databasesList.databases.forEach((db) => console.log(` - ${db.name}`));
};

export const connectDB = async () => {
  const uri =
  "mongodb+srv://<yourDbUser>:<yourDbPassword>@cluster0.a2ftxtg.mongodb.net/?retryWrites=true&w=majority";
  const client = new MongoClient(uri);
  try {
    await client.connect();
    await listDBs(client);
    console.log(`DB CONNECTED lists here:`);
  } catch (e) {
    console.error(e);
  } finally {
    await client.close();
  }
};
Now, let's start looking into how we can actually store the data. MongoDB uses a document.
We will use mongoose which is an ORM for mongoDB. Actually it is an ODM, and you can read more about that here In the backend directory, in a terminal run:
yarn add mongoose
Next replace the contents of db.js with the below:
import mongoose from "mongoose";

const mongoURI =
"mongodb+srv://<yourDbUser>:<yourDbPassword>@cluster0.a2ftxtg.mongodb.net/?retryWrites=true&w=majority";

const MealItem = mongoose.model("Meals", {
  mealItem: String,
  mealQty: Number,
  mealCals: Number,
  mealProtein: Number,
});

export const connectDB = () => {
  try {
    mongoose.connect(mongoURI);
    console.log("MongoDB connected successfully!");
  } catch (err) {
    console.log(err);
  }
};

export const addItem = async (payload) => {
  const { mealItem, mealQty, mealCals, mealProtein } = payload;
  const newMealItem = new MealItem({
    mealItem,
    mealQty,
    mealCals,
    mealProtein,
  });
  try {
    await newMealItem.save();
  } catch (err) {
    console.log(err);
  }
};
Next, in the server.js change the post("/meals") route as per below:
      app.post("/meals", async (req, res) => {
        connectDB();
        await addItem(req.body);
        res.send(JSON.stringify({ msg: "post successfull" }));
      });
* Don't forget to add the addItem() method in the import from the db.js up top in server.js.
Next, if you try to add a new item, it will get saved in your cloud instance of mongoDB. If you look at the way in which we defined the model, you can see that the mongoose.model() method takes in 2 parameters. The first parameter is the name of the 'collection' (a collection is like a table for non relational databases), so your items will appear under this specific collection, and the second parameter is the actual structure of the object we are expecting.
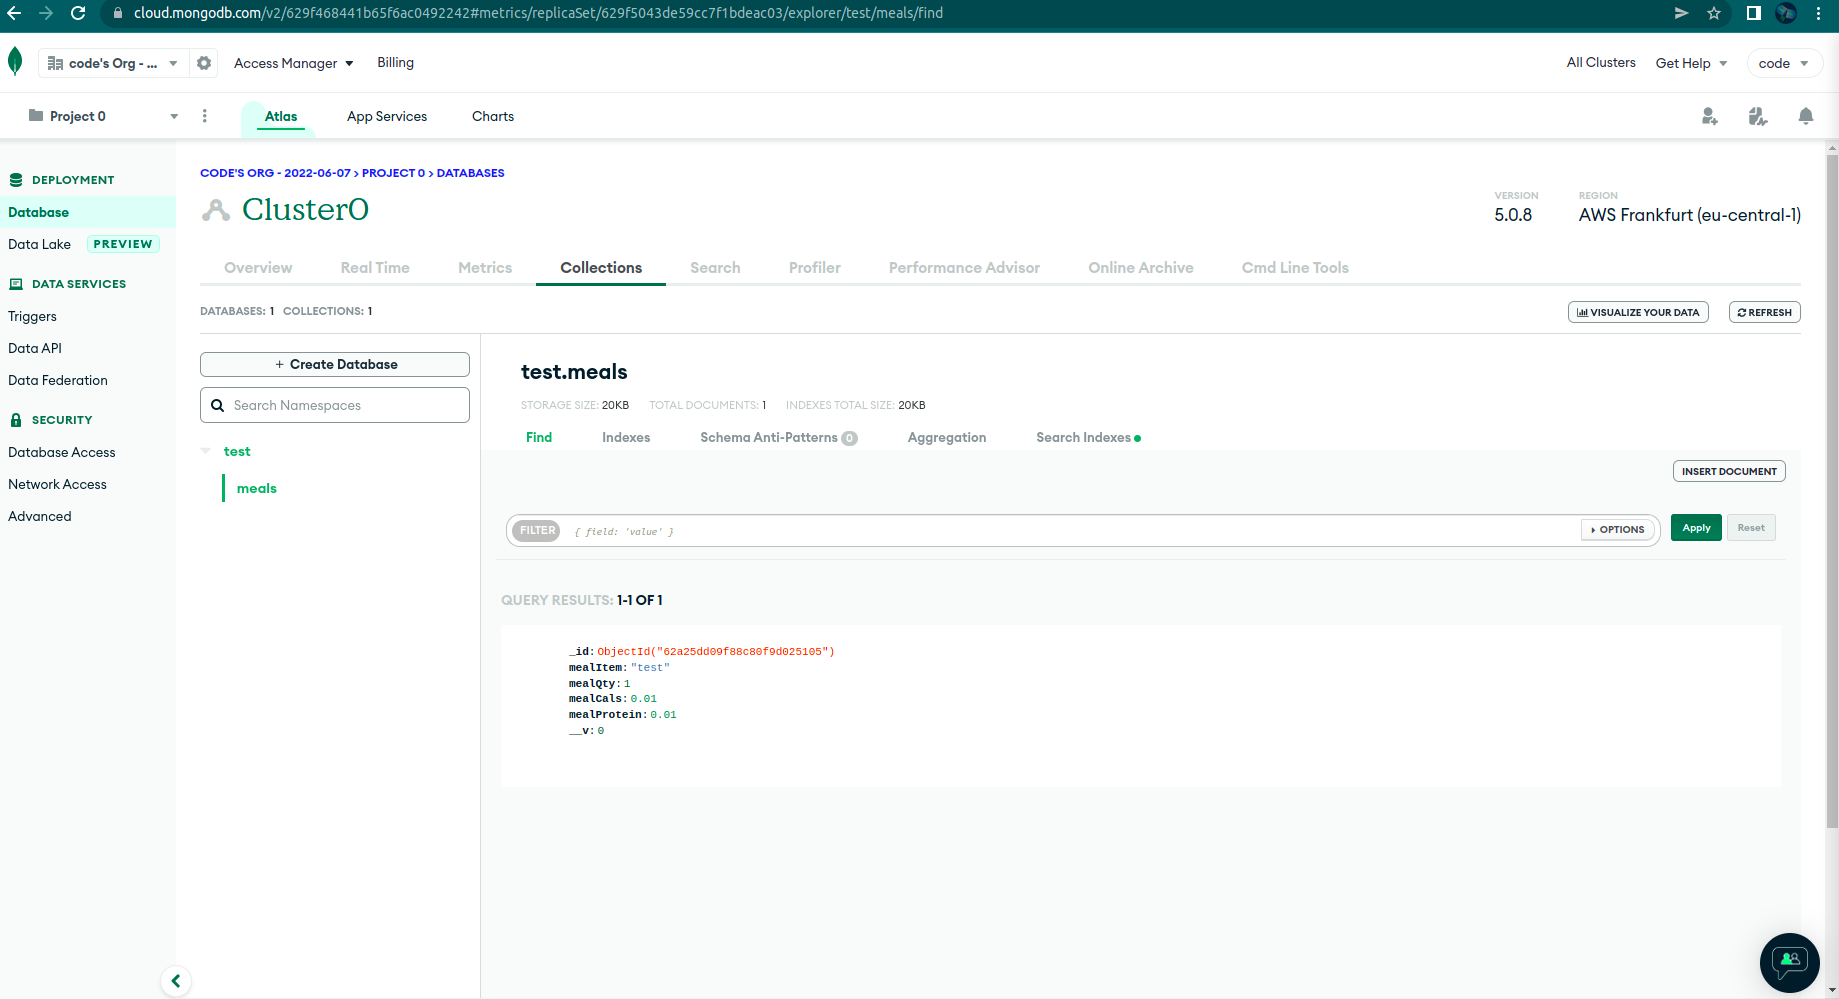
Now, if you've added an item, you should see it in the mongoDB dashboard as shown below:
The next thing we'll want to implement now is in the front. We want our react application to make an http request to our own express back-end and fetch all the mealitems from the database in order to display them.
First, add the below method into db.js:
      export const getItems = async () => {
        try {
          const meals = await MealItem.find({});
          return meals;
        } catch (err) {
          console.log(err);
        }
      };
Next, import it up to in server.js
Finally, in server.js add 1 more route:
      app.get("/meals", async (req, res) => {
        connectDB();
        const meals = await getItems();
        return res.send(meals);
      });
Next, in the front, go to MainCard.js and add the below import up top in the file:
import React, { useEffect } from "react";
Now, add a useEffect() call in the component, before the return statement:
      useEffect(() => {
        fetch("http://localhost:4000/meals", {
          method: "GET",
          headers: {
            Accept: "application/json, text/plain, */*",
            "Content-Type": "application/json",
          },
        })
          .then((res) => res.json())
          .then((res) => setMealItems(res));
      }, []);
Now, you will see that our client side react application is actually displaying data from the mongoDB cloud database. Congrats for your first MERN application!
We will stop here with the implementation but before wrapping up this article, I would like us to tidy up the code a bit and implement one more little thing.
First of all, in the db directory, create a models directory and inside of it create a MealItem.js file. Inside of it paste the below:
import mongoose from "mongoose";
export const MealItem = mongoose.model("Meals", {
  mealItem: String,
  mealQty: Number,
  mealCals: Number,
  mealProtein: Number,
});
Next, in the db.js file, replace contents with the below:
import mongoose from "mongoose";
const mongoURI =
  "mongodb+srv://YOUR_DB_USER:YOUR_DB_PASS0@cluster0.a2ftxtg.mongodb.net/?retryWrites=true&w=majority";

export const connectDB = () => {
  try {
    mongoose.connect(mongoURI);
    console.log("MongoDB connected successfully!");
  } catch (err) {
    console.log(err);
  }
};

export const addItem = async (payload, model) => {
  connectDB();
  const { mealItem, mealQty, mealCals, mealProtein } = payload;
  const newMealItem = new model({
    mealItem,
    mealQty,
    mealCals,
    mealProtein,
  });
  try {
    await newMealItem.save();
  } catch (err) {
    console.log(err);
  }
};

export const getItems = async (model) => {
  connectDB();
  try {
    const meals = await model.find({});
    return meals;
  } catch (err) {
    console.log(err);
  }
};
Finally, in the server.js, replace everything with the below:
import express from "express";
import cors from "cors";
import { connectDB, addItem, getItems } from "./db/db.js";
import { MealItem } from "./db/models/MealItem.js";
const app = express();
app.use(cors());
app.use(express.json());

app.get("/testRoute", async (req, res) => {
  connectDB();
  return res.end("Test route here...");
});

app.get("/meals", async (req, res) => {
  const meals = await getItems(MealItem);
  return res.send(meals);
});

app.post("/meals", async (req, res) => {
  await addItem(req.body, MealItem);
  res.send(JSON.stringify({ msg: "post successfull" }));
});

app.use("*", (req, res) => {
  if (req.method === "POST") {
    res.statusCode = 405;
    return res.send("Method not allowed");
  } else {
    res.statusCode = 404;
    return res.send("Page not found..");
  }
});

app.listen(4000);
We have just moved the Model in a separate file (inside the /db/models directory). This will enable us to better segment our business logic (say we add another item in our DB like a user (when we will add user authentication), we can just add a 'User' model here in a similar way). We will optimize the code more and more as we develop our application.
Next, we will add dotenv which is a plugin for environment variables. These environment variables are values that our applications needs in order to properly work and that differ from environment to environment. In this file that we'll create, we will store sensitive credentials that we do not want in git. So they will not be versioned. They will exist only on our local machine and on the machine/service where we'd deploy our application. Other than that, the file should also be stored in some secure vault or other service for securely storing sensitive data.
In our 'front' we do not store any 'sensitive data' but in our 'back' we do store the mongoURI which has the connection string with our DB user and password in it. It is never a good idea to store such sensitive credentials in git.
In a terminal 'cd' into 'back' and then run:
yarn add dotenv
Next, in the 'back' directory, create a .dotenv file and inside paste:
mongoURI=mongodb+srv://<yourDbUser>:<yourDbPassword>@cluster0.a2ftxtg.mongodb.net/?retryWrites=true&w=majority
Now in the db.js delete the const mongoURI = ... line and up-top in the file add the below 3 lines:
import { config } from "dotenv";
const { mongoURI } = config().parsed;
import mongoose from "mongoose";
Now, your application should work just as before.
Next, in the 'back' directory create a .gitignore file). Inside of it, paste the below:
.env
This will instruct git to keep track of all files, except the .env.
Now, as we do not want to 'forget' about our environment variables, create a .env_sample file in the 'back' directory, and inside of it paste:
mongoURI=
This file will stay in git but it won't have the actual value for the variable (just its name so that we don't forget we have to set this variable in order for our application to work).
Next, you need to delete the .env file from the 'back' directory and commit the deletion. After that, you can add it back, and if you modifiy more files and commit them, the .env will not be saved to git anymore.
The final thing we will implement before stoping for good with this article, is a little spinner that we want to show in the front, when we are fetching the data.
First, we need a component for th at so inside the 'components' directory, createa a Spinner.js file. Inside of it paste:
import * as React from "react";
import CircularProgress from "@mui/material/CircularProgress";

export const Spinner = () => {
  return <CircularProgress size={80} color="secondary" />;
};
Next, in the MainCard.js just import it up top:
import { Spinner } from './Spinner';
In the same file, under all the pieces of state, add 1 more:
const [isLoading, setIsLoading] = useState(false);
Next, replace the JSX returned from the MainCard.js with the below:
      <Box>
        <Grid container spacing={1} justifyContent="center">
          <Grid item xs={12} md={7}>
            <Item>
              <Header />
              {isLoading && <Spinner />}
              {!isLoading && (
                <>
                  <CustomTextField
                    id="mealItem"
                    placeholder="Meal Item"
                    changeHandler={(e) => setMealItem(e.target.value)}
                    value={mealItem}
                  />
                  <CustomTextField
                    id="mealQuantity"
                    type="number"
                    placeholder="Meal Quantity"
                    changeHandler={(e) => setMealQty(e.target.value)}
                    value={mealQty}
                  />

                  <CustomTextField
                    id="mealCalories"
                    placeholder="Meal Calories/100g"
                    type="number"
                    changeHandler={(e) => setMealCals(e.target.value)}
                    value={mealCals}
                  />

                  <CustomTextField
                    id="mealProtein"
                    placeholder="Meal Protein/100g"
                    type="number"
                    changeHandler={(e) => setProtein(e.target.value)}
                    value={mealProtein}
                  />
                  <BasicButton clickHandler={saveMeal} />
                </>
              )}
            </Item>
            <Item>
              <MealItems items={mealItems} />
            </Item>
          </Grid>
        </Grid>
      </Box>
Finally, replace the useEffect() call that makes the 'GET' request in the component as per below:
      useEffect(() => {
        setIsLoading(true);
        fetch("http://localhost:4000/meals", {
          method: "GET",
          headers: {
            Accept: "application/json, text/plain, */*",
            "Content-Type": "application/json",
          },
        })
          .then((res) => res.json())
          .then((res) => {
            setTimeout(() => {
              setIsLoading(false);
              setMealItems(res);
            }, 2000);
          });
      }, []);
Now you will have a 2 seconds delay for your request and you can see the spinner. Feel free to modify the number of seconds and test more, then just get rid of the setTimeout(). The app should work just as before, but if you have some network delay for some reason, the spinner will 'hop in' to improve the user experience.
Thanks for sticking with me so far, we have made a lot of progress on our app. You can find all the code in this repo . If you want to see the specific commit you can do so here . Next time we will implement the full CRUD operations and look into some more features and improvements.