+ a kickstarter project
Published 7th April 2021
As the title involves, this article represents an introduction to web development. We will see very briefly how the web works and we will get a bit familiar with the main technologies of the web (namely HTML , CSS and JavaScript). Finally, after 'getting our feet wet' a bit, and understanding how everything works, we will build a little project together.
This project will be a nice warm-up for future projects, and it will help you get familiar with how a JavaScript application is built, without any framework. This will help you regardless of which framework you will use (as you will build something using the full power of JavaScript, power on which all the hot frameworks now and I mean React, Angular or VueJS are built).
How the web works.
The web is like a huge network (it reaches all over the world, and anyone can 'talk' to anyone via this network).However, the main logic behind a webpage is pretty simple, the user (that's you) also called the 'client' makes an http request to a webserver. The webserver, answers the request, with the required content (let's say a webpage):
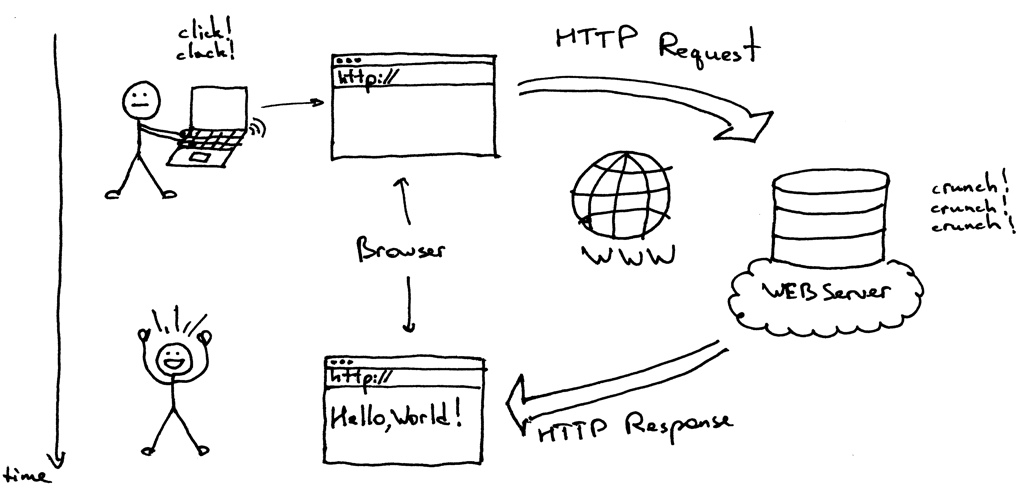
Of course there are many types of content we can request from a server (we can have a simple webpage but also a video, a game, etc...) and we will not dive deep into this for now. We can also have multiple types of HTTP Requests like: GET, POST, PUT, PATCH, DELETE. Feel free to read about them, but I think for this introductory article, we do not need to look at them in detail.
This article is meant for those who have never wrote a line of code, and who will still, be able to build a nice application by reading it. For those of you who have prior experience, feel free to just skip below to building the application as you will definitely learn something new from it.
HTML, CSS, JS basics
Before we start building the application, you need to understand how these 3 technologies work. They are the foundational blocks of the web, every web application you have seen and you will see, is built with them.
HTML
HTML stands for HyperText Markup Language. Remember, it is a markup language not a programming one (so it can represent content but it does not 'do' anything/it has no logic/ it is NOT a programming language). HTML defines the meaning and structure of web content. It uses tags for defining blocks of content. Some examples of tags would be a header ( h1 ) or a paragraph ( p ).
Usually tags come in pairs (an opening and a closing one so <p> text here...</p> but there can also be self closing tags like <img src="sample.jpg" alt="sample pic" />).
Note that beside the opening and closing tags, an HTML element can also have attributes, which are properties that further configure the element (specifying the source for the image like the src attribute, or a description of the image like the alt attribute, an attribute which is very important for SEO and accessibility).
For a better understanding, let's create quickly a basic webpage with some text on it. Copy the below code and paste it in a index.html file. Ignore the unknown tags or attributes for now, little by little you will learn about all of them.
<!DOCTYPE html>
<html lang="en">
  <head>
    <meta charset="UTF-8" />
    <meta
      name="viewport"
      content="width=device-width,
      initial-scale=1.0" />
    <title>My first wepbage</title>
  </head>
  <body>
    <h1>This is my first webpage</h1>
  <p>I am very excited to further develop it.</p>
  </body>
</html>
Open the page you just created in a browser and you will see some plain looking, simple page:
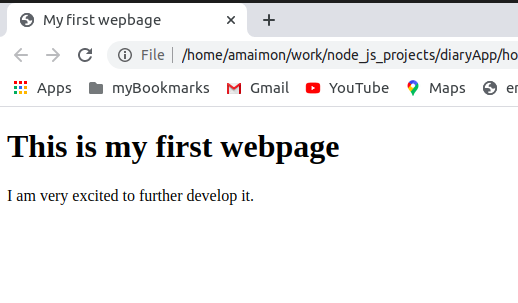
* Note how the title tag is reflected in the title of the browser tab.
CSS - Cascading Style Sheets
In order to make our little webpage look better, let's add some CSS to it. CSS stands for Cascading Style Sheets. This means that the 'styles' we set with our CSS code, are applied from top to bottom in a cascading way. The same can be said about CSS links.
CSS has no logic behind it but it is basically a language that describes the presentation of an HTML page.
In order to add CSS to our document, we can use a link such as <link rel="stylesheet" href="myStyle.css" />, an inline style attribute such as <p style="color:red;">my red text here..</p> or a <style> </style> tag. For this basic demo, we will use a style tag so add it as per below:
  <!DOCTYPE html>
  <html lang="en">
    <head>
      <meta charset="UTF-8" />
      <meta
        name="viewport"
        content="width=device-width,
        initial-scale=1.0" />
      <title>My first wepbage</title>
      <style>
        /* css rules here */
      </style>
    </head>
    <body>
      <h1>This is my first webpage</h1>
      <p>I am very excited to further develop it.</p>
    </body>
  </html>
CSS can "style" elements by selecting them. Let's say we want to select a paragraph and apply some styles to it. This is how you select a paragraph with css:
<!DOCTYPE html>
<html lang="en">
  <head>
    <meta charset="UTF-8" />
    <meta
      name="viewport"
      content="width=device-width,
      initial-scale=1.0" />
    <title>My first wepbage</title>
    <style>
      /* css rules here */
      p {
        display: block;
        margin: auto;
        font-size: 2rem;
        background: blue;
        border: 5px solid #ccc;
        color: #fff;
        text-align: center;
        width: 30rem;
        padding: 1rem;
        border-radius: 15px;
      }
    </style>
  </head>
  <body>
    <h1>This is my first webpage</h1>
    <p>
      I am very excited to further
        develop it.
    </p>
  </body>
</html>
Note how the styles changed with a single CSS rule for the paragraph. However, our approach is not ideal. The reason for this is that usually css rules complexity gets out of control if we are not careful. In order for the complexity to be kept under control (and for the rules not to conflict with each other) we need the CSS rules to be as specific as possible. We can increase the specificity by moving the rule we wrote inside a class.
We do this by changing the rule (specifying that it applies to a class instead of a paragraph selector):
    <!DOCTYPE html>
    <html lang="en">
      <head>
        <meta charset="UTF-8" />
        <meta
          name="viewport"
          content="width=device-width,
          initial-scale=1.0" />
        <title>My first wepbage</title>
        <style>
          /* css rules here */
          .blue-card {
            display: block;
            margin: auto;
            font-size: 2rem;
            background: blue;
            border: 5px solid #ccc;
            color: #fff;
            text-align: center;
            width: 30rem;
            padding: 1rem;
            border-radius: 15px;
          }
        </style>
      </head>
      <body>
        <h1>This is my first webpage</h1>
        <p class="blue-card">
          I am very excited to further
            develop it.
        </p>
      </body>
    </html>
Note how the styles apply in the exact same way and now if we want the same styles on a different paragraph, we just have to apply the class="blue-card" to it.
Let's add one more class for the header.
      <!DOCTYPE html>
      <html lang="en">
        <head>
          <meta charset="UTF-8" />
          <meta
            name="viewport"
            content="width=device-width,
            initial-scale=1.0" />
          <title>My first wepbage</title>
          <style>
            /* css rules here */
            .blue-card {
              display: block;
              margin: auto;
              font-size: 2rem;
              background: blue;
              border: 5px solid #ccc;
              color: #fff;
              text-align: center;
              width: 30rem;
              padding: 1rem;
              border-radius: 15px;
            }

            .header {
              display: block;
              margin: auto;
              text-align: center;
              background: green;
              color: #fff;
              padding: 1rem;
              font-size: 2.5rem;
              width: 30rem;
              border: 8px solid #000;
              padding: 1rem;
              border-radius: 15px;
              margin-top: 1rem;
              margin-bottom: 1rem;
            }
          </style>
        </head>
        <body>
          <h1
            class="header"
            >
              This is my first webpage</h1>
          <p class="blue-card">
            I am very excited to further
              develop it.
          </p>
        </body>
      </html>
Now the styles for the header have also changed. Feel free to change the colors or play around with the background of the page.
JavaScript
JavaScript is a highly interactiv, dynamic, programming language. It can add logic to our webpage. It can make it 'do' and 'remember' stuff and add interactivity to it.
I will not do a generic introduction to JavaScript, as this is not the place for it, I will just show you how to add JavaScript to your webpage and then, we will move on to building the application.
In order to add JavaScript to a page, we have to use a <script></script> tag. The script tag can reference a file, like this:
<script src="myScript.js" > </script>
In the case above, the JavaScript code is inside the myScript.js file. However, we can also have the JavaScript code directly in the script tag:
          <script>
            //code that does stuff here
          </script>
For our introductory demo, we will use the latter approach and write the code directly inside the script tag.
Start by adding a script tag and an input field in the webpage:
          <!DOCTYPE html>
          <html lang="en">
            <head>
              <meta charset="UTF-8" />
              <meta
                name="viewport"
                content="width=device-width,
                initial-scale=1.0" />
              <title>My first wepbage</title>
              <style>
                /* css rules here */
                .blue-card {
                  display: block;
                  margin: auto;
                  font-size: 2rem;
                  background: blue;
                  border: 5px solid #ccc;
                  color: #fff;
                  text-align: center;
                  width: 30rem;
                  padding: 1rem;
                  border-radius: 15px;
                }

                .header {
                  display: block;
                  margin: auto;
                  text-align: center;
                  background: green;
                  color: #fff;
                  padding: 1rem;
                  font-size: 2.5rem;
                  width: 30rem;
                  border: 8px solid #000;
                  padding: 1rem;
                  border-radius: 15px;
                  margin-top: 1rem;
                  margin-bottom: 1rem;
                }
              </style>
            </head>
            <body>
              <h1
                class="header"
                >
                  This is my first webpage</h1>
              <p class="blue-card">
                I am very excited to further
                  develop it.
              </p>
              <input type="text" id="myInput" />

              <script>

              </script>
            </body>
          </html>
We will now use the newly added input, to change the value of the header. We will set the script up so that whenever we write something in the field, it puts it inside the header (replacing its value with it).
Note that we have an id of myInput for the input field, so we will grab onto it with a JavaScript selector (similar to the CSS one). Add the code below to your script:
<!DOCTYPE html>
<html lang="en">
  <head>
    <meta charset="UTF-8" />
    <meta
      name="viewport"
      content="width=device-width,
      initial-scale=1.0" />
    <title>My first wepbage</title>
    <style>
      /* css rules here */
      .blue-card {
        display: block;
        margin: auto;
        font-size: 2rem;
        background: blue;
        border: 5px solid #ccc;
        color: #fff;
        text-align: center;
        width: 30rem;
        padding: 1rem;
        border-radius: 15px;
      }

      .header {
        display: block;
        margin: auto;
        text-align: center;
        background: green;
        color: #fff;
        padding: 1rem;
        font-size: 2.5rem;
        width: 30rem;
        border: 8px solid #000;
        padding: 1rem;
        border-radius: 15px;
        margin-top: 1rem;
        margin-bottom: 1rem;
      }
    </style>
  </head>
  <body>
    <h1
      class="header"
      >
        This is my first webpage</h1>
    <p class="blue-card">
      I am very excited to further
        develop it.
    </p>
    <input type="text" id="myInput" />

    <script>
  //grab the input value typed by the user
  var input = document.getElementById("myInput");
  //grab the header (to write input value in it)
  var header = document.querySelector(".header");

  //add an 'event' to trigger when the user types
  input.addEventListener("input", function (event) {
    //grab the typed value
    var newHeaderValue = event.target.value;
    //set the typed value as new header value;
    header.innerHTML = newHeaderValue;
  });
    </script>
  </body>
</html>
Now whatever you type in the field will get put in the green header.
This is how you 'connect' HTML code with a CSS and JavaScript. These three technologies together, can do many awesome things and you will love to use them.
If you never wrote a line of code, I bet you feel a bit like a wizzard now. At least that's how I felt when I first connected some HTML code with a CSS file and a JavaScript one.
Building a real application
Now, that we have 'got our feet wet' and we know how HTML, CSS and JavaScript work together, we can try to put together a little project. This will be an introductory project, and it will represent a nice transition towards more advanced full-stack applications that we will build in the future. We will build a note taking application. The application will only have a client (a 'front page' doing all the logic for us). There will be no server (to store data for us or to import/export data, filter it and do other 'back-end' related stuff). However, the applicaiton will be able to do many things and it will sort of 'mimmick' a real backend.
Here's a link of a live deployment of the application, so you can see what we will build and what it will look like: Link to app.
Test the application a bit before starting, so you get familiar with how it works and what you will be building. Try adding some notes, edit them, delete some and add them back, etc...
Try exporting your notes, delete all the notes and import them back. The import functionality is set so that it prepends the imported notes to the existing ones (so if you import without deleting the current notes, you will simply get the ones imported added to the top of the list of your current ones).
The most important thing to notice about the application, is that it does not need a refresh of the page. Everything you do instantly updates the screen without the need for a refresh or a redirect (note that the URL never changes either, so you are basically staying on the same page continuously, and dynamically manipulate its contents to suit your needs). This is how modern front-end frameworks like React or Angular work.
Once you get used to the application, we can start building it. It will be a single page application, it will serve all the contents in an index.html file and all the contents there (the routing from one page/section) to the next, will be performed dynamically, with JavaScript by adding and removing/hiding stuff from the DOM. For those of you who are complete beginners, I will not be able to do a full introduction on the Document Object Model (that's the DOM), but just remember that it is a tree-like representation of the webpage, in which all elements of a page are branches of a tree. It looks like this:
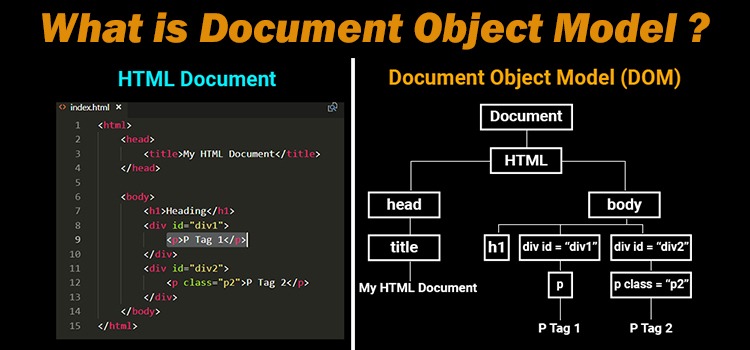
*note that the reason why the CSS selectors above in the introductory section are similar to the JS ones is because they actually reference the very same 'branches' from the DOM tree.
So as for the structure of our application, we will have an index.html file, a css file and two JavaScript files. The two JavaScript files are handling the UI (user interface) and the notes processing. So one will do the notes and the other one will do the interface manipulation (and there will be quite a bit of code in there).
Application start (UI creation)
Start by creating a folder (I named mine project) and create an index.html file in it. Inside the .html file, add the below code:
  <head>
    <meta charset="UTF-8" />
    <meta
      name="viewport"
      content="width=device-width, initial-scale=1.0"
    />

<link
rel="stylesheet"
href="https://stackpath.bootstrapcdn.com/font-awesome
/4.7.0/css/font-awesome.min.css"
/>

    <link rel="stylesheet" href="style.css" />
    <title>Diary App</title>
    </head>
    <body>
    <div class="nav">
        <div
          id="inputBtn"
          class="navItem"
          tabindex="1">
            Input
        </div>

        <div
          id="recordsBtn"
          class="navItem"
          tabindex="1"
        >
            Entries
        </div>

        <div
          id="importExportBtn"
          class="navItem"
          tabindex="1"
        >
            Import/Export
        </div>

    </div>

      <div class="colors">
        <div id="c1" class="color"></div>
        <div id="c2" class="color"></div>
        <div id="c3" class="color"></div>
      </div>

      <!-- input section -->

      <!-- entries section -->

      <!-- import export section -->

    <div class="alert"></div>
    <script src="notes.js"></script>
    <script src="ui.js"></script>
  </body>
</html>
*note how the ui.js script is under the notes.js one. This means that it can use variables and methods declared in notes.js as JavaScript 'scripts' apply top to bottom.
This is only a part of our UI, but we will start working on the interface from it.
Next, create the 3 files referenced into the HTML, namely the style.css, notes.js and ui.js. Now, you can open the index.html file in the browser, and you will see some very ugly html code thrown in there. Do not worry, we will right now start styling it and make it look pretty and do awesome things.
We will start working on the style.css file in order to make the first bit of UI look better. Add the below code to the css file:
    /* make text non-selectable */
* {
  -webkit-touch-callout: none; /* iOS Safari */
  -webkit-user-select: none; /* Safari */
  -khtml-user-select: none; /* Konqueror HTML */
  -moz-user-select: none; /* Firefox */
  -ms-user-select: none; /* Internet Explorer/Edge */
  user-select: none; /* Non-prefixed version,
                        currently supported
                        by Chrome and Opera */
}

body {
  background: rgb(108, 140, 226);
}

/* navigation */
.nav {
  display: block;
  margin: auto;
  width: 40vw;
}

/* navigation item */
.nav > .navItem {
  background: rgb(38, 0, 255);
  display: inline-block;
  color: #fff;
  border: 2px solid #ccc;
  width: 32%;
  height: 3rem;
  text-align: center;
  padding-top: 10px;
  border-radius: 15px;
  font-size: 2rem;
}

.nav > .navItem:hover {
  cursor: pointer;
  transition: 1s;
}

.nav > .navItem:focus {
  outline: none;
}

/* colors */
.colors {
  background: #fff;
  width: 10rem;
  height: 5rem;
  display: block;
  margin: auto;
  margin-top: 2rem;
  border-radius: 30px;
}

.color:hover {
  cursor: pointer;
}

.color:first-child {
  background: blue;
  width: 2rem;
  height: 2rem;
  display: inline-block;
  margin-top: 15%;
  margin-left: 8%;
  border-radius: 50%;
}

.color:nth-child(2) {
  background: rgb(255, 239, 19);
  width: 2rem;
  height: 2rem;
  display: inline-block;
  margin-top: 15%;
  margin-left: 8%;
  border-radius: 50%;
}

.color:nth-child(3) {
  background: pink;
  width: 2rem;
  height: 2rem;
  display: inline-block;
  margin-top: 15%;
  margin-left: 8%;
  border-radius: 50%;
}

/* media queries for responsiveness */
@media (max-width: 1500px) {
  .nav {
    width: 60vw;
  }
}

@media (max-width: 1000px) {
  .nav {
    width: 80vw;
  }
}

@media (max-width: 750px) {
  .nav {
    width: 70vw;
  }
  .nav > .navItem {
    display: block;
    margin: auto;
    margin-bottom: 1rem;
    width: 100%;
  }
}
Now everything looks much better. We now want to implement an 'active' class on each of the navigation items we have there. And we want to set it up so that whenever we click one of them, it 'activates' and it displays the specific section it is allocated to. For instance, when we click on 'input', we want the input to be displayed, 'entries' should display the diary entries and 'import/export' should display the import and export section.
For starters, we will make it so that the input section is displayed when we click on the 'Input' navigation item.
The first thing we need to do is add the input section. As you have seen in the demo project, the input section looks just like a stack of sheets of paper, so let's add that to the UI.
Add the below div, right under the <!-- input section --> comment in index.html
<div id="input">
  <div class="paper">
    <textarea
      name="note"
      id="note"
      cols="120"
      rows="10"
    >
    </textarea>
    <button class="add-note">
      Save Note <i
                  class="fa fa-pencil"
                  aria-hidden="true"
                ></i>
    </button>
  </div>
</div>
The input section obviously looks bad so let's add some CSS styling for it first. Replace all the code in style.css with the below:
/* make text non-selectable */
* {
  -webkit-touch-callout: none; /* iOS Safari */
  -webkit-user-select: none; /* Safari */
  -khtml-user-select: none; /* Konqueror HTML */
  -moz-user-select: none; /* Firefox */
  -ms-user-select: none; /* Internet Explorer/Edge */
  user-select: none; /* Non-prefixed version, currently
                        supported by Chrome and Opera */
}

body {
  background: rgb(108, 140, 226);
}

/* navigation */
.nav {
  display: block;
  margin: auto;
  width: 40vw;
}

/* navigation item */
.nav > .navItem {
  background: rgb(38, 0, 255);
  display: inline-block;
  color: #fff;
  border: 2px solid #ccc;
  width: 32%;
  height: 3rem;
  text-align: center;
  padding-top: 10px;
  border-radius: 15px;
  font-size: 1.8rem;
}

.nav > .navItem:hover {
  cursor: pointer;
  transition: 1s;
}

.nav > .navItem:focus {
  outline: none;
}

/* colors */
.colors {
  background: #fff;
  width: 10rem;
  height: 5rem;
  display: block;
  margin: auto;
  margin-top: 2rem;
  border-radius: 30px;
}

.color:hover {
  cursor: pointer;
}

.color:first-child {
  background: blue;
  width: 2rem;
  height: 2rem;
  display: inline-block;
  margin-top: 15%;
  margin-left: 8%;
  border-radius: 50%;
}

.color:nth-child(2) {
  background: rgb(255, 239, 19);
  width: 2rem;
  height: 2rem;
  display: inline-block;
  margin-top: 15%;
  margin-left: 8%;
  border-radius: 50%;
}

.color:nth-child(3) {
  background: pink;
  width: 2rem;
  height: 2rem;
  display: inline-block;
  margin-top: 15%;
  margin-left: 8%;
  border-radius: 50%;
}

/*hide paper initially*/
#input {
  display: none;
}

/* paper styles for the input form */
.paper {
  background: radial-gradient(rgb(248, 246, 246), #ebebe9);
  padding: 60px;
  position: relative;
  width: 80vw;
  display: block;
  margin: auto;
  margin-top: 3rem;
  height: 20rem;
}

.paper,
.paper::before,
.paper::after {
  /* Styles to distinguish sheets from one another */
  box-shadow: 1px 1px 1px rgba(0, 0, 0, 0.25);
  border: 1px solid rgb(199, 198, 198);
}

.paper::before,
.paper::after {
  content: "";
  position: absolute;
  background-color: #e5e2e2;
}

.paper::before {
  right: 15px;
  top: 0;
  transform: rotate(-2deg);
  z-index: -1;
  width: 100%;
  height: 103%;
  margin-top: -1rem;
}

.paper::after {
  top: 5px;
  right: -5px;
  transform: rotate(2deg);
  z-index: -2;
  width: 98%;
  height: 97%;
}

.paper > textarea {
  border: none;
  overflow: auto;
  outline: none;
  -webkit-box-shadow: none;
  -moz-box-shadow: none;
  box-shadow: none;
  font-size: 2rem;
  width: 100%;
  height: 100%;
  background: radial-gradient(#fff, #ebebe9);
  color: black;
  resize: none;
  font-family: Arial, Helvetica, sans-serif;
}

.add-note {
  background: rgb(156, 154, 154);
  color: #fff;
  outline: none;
  border: 2px solid #eee;
  font-size: 2rem;
  border-radius: 15px;
}

.add-note:hover {
  cursor: pointer;
  background: rgb(39, 37, 37);
  transition: 1s;
}

/* media queries for responsiveness */
@media (max-width: 1500px) {
  .nav {
    width: 60vw;
  }
}

@media (max-width: 1000px) {
  .nav {
    width: 80vw;
  }
}

@media (max-width: 750px) {
  .nav {
    width: 70vw;
  }
  .nav > .navItem {
    display: block;
    margin: auto;
    margin-bottom: 1rem;
    width: 100%;
  }

  .add-note {
    font-size: 1.5rem;
  }
}
Before being able to see the input section, just comment out the rule from the #input id selector that hides it. I will paste the commented rule here:
/*hide paper initially*/
#input {
  /*display: none;*/
}
This is what the input for for our notes will look like. Note how the paper sheets are built with CSS around the .paper class. Also, note how we made use of the ::before and ::after pseudo-elements to style the other 'sheets' of paper, the ones on top of which the first one sits. For them, we manipulated properties such as rotation angle or border to give the 'sheets' of paper a realistic appearance.
Hide the input section by uncommenting the very same line you just commented in. This will hide the input form (as it should be hidden intially and display only once the user clicks on the Input button).
Next we will add and style the entries section. This is where the diary notes will be displayed. Start by adding the HTML for it in the index.html right under the <!-- entries section --> comment in index.html:
<div class="diaryEntries">
  <div
    id="deleteNotes"
    class="navItem"
    tabindex="1">
      Delete Notes <i
                    class="fa fa-minus-circle"
                    aria-hidden="true"
                  ></i>
  </div>
  <input
    oninput="filter()"
    class="filter uiText"
    type="text"
    value="filter notes"
  />
  <div id="records"></div>
</div>
Refresh the page, and surprise! You will see some more ugly looking HTML. Actually this time it is quite less compared to the input section. Anyhow, let's style it and make it pretty. Add the styles for the diary entries right in the style.css file, which upgraded will look like this:
/* make text non-selectable */
* {
  -webkit-touch-callout: none; /* iOS Safari */
  -webkit-user-select: none; /* Safari */
  -khtml-user-select: none; /* Konqueror HTML */
  -moz-user-select: none; /* Firefox */
  -ms-user-select: none; /* Internet Explorer/Edge */
  user-select: none; /* Non-prefixed version, currently
                        supported by Chrome and Opera */
}

body {
  background: rgb(108, 140, 226);
}

/* navigation */
.nav {
  display: block;
  margin: auto;
  width: 40vw;
}

/* navigation item */
.nav > .navItem {
  background: rgb(38, 0, 255);
  display: inline-block;
  color: #fff;
  border: 2px solid #ccc;
  width: 32%;
  height: 3rem;
  text-align: center;
  padding-top: 10px;
  border-radius: 15px;
  font-size: 1.8rem;
}

.nav > .navItem:hover {
  cursor: pointer;
  transition: 1s;
}

.nav > .navItem:focus {
  outline: none;
}

/* colors */
.colors {
  background: #fff;
  width: 10rem;
  height: 5rem;
  display: block;
  margin: auto;
  margin-top: 2rem;
  border-radius: 30px;
}

.color:hover {
  cursor: pointer;
}

.color:first-child {
  background: blue;
  width: 2rem;
  height: 2rem;
  display: inline-block;
  margin-top: 15%;
  margin-left: 8%;
  border-radius: 50%;
}

.color:nth-child(2) {
  background: rgb(255, 239, 19);
  width: 2rem;
  height: 2rem;
  display: inline-block;
  margin-top: 15%;
  margin-left: 8%;
  border-radius: 50%;
}

.color:nth-child(3) {
  background: pink;
  width: 2rem;
  height: 2rem;
  display: inline-block;
  margin-top: 15%;
  margin-left: 8%;
  border-radius: 50%;
}

/*hide paper initially*/
#input {
  display: none;
}

/* paper styles for the input form */
/* paper styles for the input form */
.paper {
  background: radial-gradient(rgb(248, 246, 246), #ebebe9);
  padding: 60px;
  position: relative;
  width: 80vw;
  display: block;
  margin: auto;
  margin-top: 3rem;
  height: 20rem;
}

.paper,
.paper::before,
.paper::after {
  /* Styles to distinguish sheets from one another */
  box-shadow: 1px 1px 1px rgba(0, 0, 0, 0.25);
  border: 1px solid rgb(199, 198, 198);
}

.paper::before,
.paper::after {
  content: "";
  position: absolute;
  background-color: #e5e2e2;
}

.paper::before {
  right: 15px;
  top: 0;
  transform: rotate(-2deg);
  z-index: -1;
  width: 100%;
  height: 103%;
  margin-top: -1rem;
}

.paper::after {
  top: 5px;
  right: -5px;
  transform: rotate(2deg);
  z-index: -2;
  width: 98%;
  height: 97%;
}

.paper > textarea {
  border: none;
  overflow: auto;
  outline: none;
  -webkit-box-shadow: none;
  -moz-box-shadow: none;
  box-shadow: none;
  font-size: 2rem;
  width: 100%;
  height: 100%;
  background: radial-gradient(#fff, #ebebe9);
  color: black;
  resize: none;
  font-family: Arial, Helvetica, sans-serif;
}

.add-note {
  background: rgb(156, 154, 154);
  color: #fff;
  outline: none;
  border: 2px solid #eee;
  font-size: 2rem;
  border-radius: 15px;
}

.add-note:hover {
  cursor: pointer;
  background: rgb(39, 37, 37);
  transition: 1s;
}

/* notes style */
.card {
  display: block;
  margin: auto;
  width: 90vw;
  font-size: 2rem;
  background: #f0edd9;
  padding: 1rem;
}

.card.card-fresh > p.text {
  /* background: red; */
  overflow-wrap: break-word !important;
  word-wrap: break-word !important;
  hyphens: auto !important;
  font-family: inherit !important;
}

.invisible {
  display: none;
}

.pencil-note:hover {
  cursor: pointer;
}

.fa-save {
  display: inline !important;
}

#saveEdit:hover {
  cursor: pointer;
}

.fa-times-circle {
  margin-left: 90%;
  margin-bottom: 5srem;
}

.fa-times-circle:hover {
  cursor: pointer;
}

.filter {
  display: none;
  margin: auto;
  margin-top: 2rem;
  width: 20rem;
  height: 3rem;
  font-size: 2rem;
  text-align: center;
  margin-bottom: 1rem;
  outline: none;
  border: 2px solid #000;
  border-radius: 15px;
}

::-webkit-input-placeholder {
  text-align: center;
}

/* delete Notes Button */
#deleteNotes {
  background: rgb(194, 57, 57) !important;
  display: block;
  margin: auto;
  margin-top: 1rem;
  margin-bottom: 1rem;
  color: #fff;
  border: 2px solid #ccc;
  width: 20%;
  height: 3rem;
  text-align: center;
  padding-top: 10px;
  border-radius: 15px;
  font-size: 2rem;
  outline: none;
}

#deleteNotes:hover {
  cursor: pointer;
}

/* media queries for responsiveness */
@media (max-width: 1500px) {
  .nav {
    width: 60vw;
  }

  #deleteNotes {
    width: 25%;
  }
}

@media (max-width: 1000px) {
  .nav {
    width: 80vw;
  }
  #deleteNotes {
    width: 30%;
  }
}

@media (max-width: 750px) {
  .nav {
    width: 70vw;
  }
  .nav > .navItem {
    display: block;
    margin: auto;
    margin-bottom: 1rem;
    width: 100%;
  }

  .add-note {
    font-size: 1.5rem;
  }

  .card {
    font-size: 1.5rem;
    width: 70vw;
  }

  #deleteNotes {
    width: 45%;
  }
}

@media (max-width: 590px) {
  .add-note {
    display: block;
    margin: auto;
  }
}

@media (max-width: 500px) {
  .navItem {
    width: 100% !important;
  }

  .paper {
    max-width: 50%;
  }

  #deleteNotes {
    width: 75%;
  }
}
Now refresh the page, and no new elements at all 😕 except for the 'Delete' button. That is because the notes will be added dynamically through JavaScript and we have none at the moment. However, if you'd like to see what they will look like, just paste the below code in the index.html, right inside the div with the id #records. That's where our little JS script will insert the real notes too:
<div class="card">
  <p class="text">
    Lorem ipsum dolor sit amet consectetur
    adipisicing elit. Omnis deleniti unde
    laudantium nam recusandae eaque perferendis
    voluptatem nobis distinctio sunt! Repudiandae,
    doloribus unde delectus accusantium aspernatur
    dolores cupiditate incidunt autem doloremque
    deleniti minus optio tenetur dolorum recusandae.
    Harum possimus eius magni rem facere! Rerum
    quos natus architecto suscipit, quisquam
    exercitationem!
  </p>
  <p class="text">Written at: 15-Sep-2020</p>
  <p
    class="text invisible"
  >
    id: 2sweecfuks046mw3k019rx
  </p>
  <i
    class="fa fa-pencil pencil-note"
    aria-hidden="true"
  >
  </i>
  <span id="saveEdit"></span
  ><i
    class="fa fa-times-circle"
    aria-hidden="true"
  ></i>
  <hr />
</div>
Next, delete the note code and hide the .diaryEntries div with a new CSS property, add it right under the notes styles and above the .add-note class:
  /*hide entries initially*/
.diaryEntries {
  display: none;
}
We will now move on to the import/export section. Add the HTML code for it in index.html, right under <!-- import export section -->:
<div class="importExport">
  <div class="nav">
    <br />
    <p class="uiText">
      Use the buttons below to export your
      notes as a JSON file or to import
      a JSON notes for your notes feed.
    </p>
    <div id="importBtn"
        class="navItem import" tabindex="1">
      Import
      <input
        class="import-file"
        type="file"
        id="file"
        name="file"
        enctype="multipart/form-data"
      />
      <i
        class="fa fa-cloud-upload"
        aria-hidden="true"></i>
    </div>
    <div id="exportBtn"
        class="navItem import"
        tabindex="1">
      Export
      <i
        class="fa fa-cloud-download"
        aria-hidden="true"></i>
    </div>
  </div>
</div>
Now, when you refresh, you will see some small but still ugly HTML code and part of it will be already styled. Let's style the rest and upgrade style.css again:
/* make text non-selectable */
* {
  -webkit-touch-callout: none; /* iOS Safari */
  -webkit-user-select: none; /* Safari */
  -khtml-user-select: none; /* Konqueror HTML */
  -moz-user-select: none; /* Firefox */
  -ms-user-select: none; /* Internet Explorer/Edge */
  user-select: none; /* Non-prefixed version, currently
                        supported by Chrome and Opera */
}

body {
  background: rgb(108, 140, 226);
}

/* navigation */
.nav {
  display: block;
  margin: auto;
  width: 40vw;
}

/* navigation item */
.nav > .navItem {
  background: rgb(38, 0, 255);
  display: inline-block;
  color: #fff;
  border: 2px solid #ccc;
  width: 32%;
  height: 3rem;
  text-align: center;
  padding-top: 10px;
  border-radius: 15px;
  font-size: 1.8rem;
}

.nav > .navItem:hover {
  cursor: pointer;
  transition: 1s;
}

.nav > .navItem:focus {
  outline: none;
}

/* colors */
.colors {
  background: #fff;
  width: 10rem;
  height: 5rem;
  display: block;
  margin: auto;
  margin-top: 2rem;
  border-radius: 30px;
}

.color:hover {
  cursor: pointer;
}

.color:first-child {
  background: blue;
  width: 2rem;
  height: 2rem;
  display: inline-block;
  margin-top: 15%;
  margin-left: 8%;
  border-radius: 50%;
}

.color:nth-child(2) {
  background: rgb(255, 239, 19);
  width: 2rem;
  height: 2rem;
  display: inline-block;
  margin-top: 15%;
  margin-left: 8%;
  border-radius: 50%;
}

.color:nth-child(3) {
  background: pink;
  width: 2rem;
  height: 2rem;
  display: inline-block;
  margin-top: 15%;
  margin-left: 8%;
  border-radius: 50%;
}

/*hide paper initially*/
#input {
  display: none;
}

/* paper styles for the input form */
.paper {
  background: radial-gradient(rgb(248, 246, 246), #ebebe9);
  padding: 60px;
  position: relative;
  width: 80vw;
  display: block;
  margin: auto;
  margin-top: 3rem;
  height: 20rem;
}

.paper,
.paper::before,
.paper::after {
  /* Styles to distinguish sheets from one another */
  box-shadow: 1px 1px 1px rgba(0, 0, 0, 0.25);
  border: 1px solid rgb(199, 198, 198);
}

.paper::before,
.paper::after {
  content: "";
  position: absolute;
  background-color: #e5e2e2;
}

.paper::before {
  right: 15px;
  top: 0;
  transform: rotate(-2deg);
  z-index: -1;
  width: 100%;
  height: 103%;
  margin-top: -1rem;
}

.paper::after {
  top: 5px;
  right: -5px;
  transform: rotate(2deg);
  z-index: -2;
  width: 98%;
  height: 97%;
}

.paper > textarea {
  border: none;
  overflow: auto;
  outline: none;
  -webkit-box-shadow: none;
  -moz-box-shadow: none;
  box-shadow: none;
  font-size: 2rem;
  width: 100%;
  height: 100%;
  background: radial-gradient(#fff, #ebebe9);
  color: black;
  resize: none;
  font-family: Arial, Helvetica, sans-serif;
}

/*hide entries initially*/
.diaryEntries {
  display: none;
}

.add-note {
  background: rgb(156, 154, 154);
  color: #fff;
  outline: none;
  border: 2px solid #eee;
  font-size: 2rem;
  border-radius: 15px;
}

.add-note:hover {
  cursor: pointer;
  background: rgb(39, 37, 37);
  transition: 1s;
}

/* notes style */
.card {
  display: block;
  margin: auto;
  width: 90vw;
  font-size: 2rem;
  background: #f0edd9;
  padding: 1rem;
}

.card.card-fresh > p.text {
  /* background: red; */
  overflow-wrap: break-word !important;
  word-wrap: break-word !important;
  hyphens: auto !important;
  font-family: inherit !important;
}

.invisible {
  display: none;
}

.pencil-note:hover {
  cursor: pointer;
}

.fa-save {
  display: inline !important;
}

#saveEdit:hover {
  cursor: pointer;
}

.fa-times-circle {
  margin-left: 90%;
  margin-bottom: 5srem;
}

.fa-times-circle:hover {
  cursor: pointer;
}

.filter {
  display: none;
  margin: auto;
  margin-top: 2rem;
  width: 20rem;
  height: 3rem;
  font-size: 2rem;
  text-align: center;
  margin-bottom: 1rem;
  outline: none;
  border: 2px solid #000;
  border-radius: 15px;
}

::-webkit-input-placeholder {
  text-align: center;
}

/* delete Notes Button */
#deleteNotes {
  background: rgb(194, 57, 57) !important;
  display: block;
  margin: auto;
  margin-top: 1rem;
  margin-bottom: 1rem;
  color: #fff;
  border: 2px solid #ccc;
  width: 20%;
  height: 3rem;
  text-align: center;
  padding-top: 10px;
  border-radius: 15px;
  font-size: 2rem;
  outline: none;
}

#deleteNotes:hover {
  cursor: pointer;
}

/* import export styles */
.importExport {
  /* display: none; */
}

.import {
  width: 48% !important;
}

.import-file {
  opacity: 0;
  width: 100%;
  height: 100%;
  position: absolute;
  top: 0;
  left: 0;
}

#importBtn {
  position: relative;
}

.uiText {
  display: block;
  margin: auto;
  text-align: center;
  font-size: 2rem;
  background: #fff;
  padding: 1rem;
  border-radius: 15px;
  margin-bottom: 2rem;
  color: #524f4f;
  border: 2px solid #ccc;
}

/* alert div styles (used for add and import/export */
.alert {
  margin-top: 5rem;
  max-width: 40rem;
}

/* media queries for responsiveness */
@media (max-width: 1500px) {
  .nav {
    width: 60vw;
  }

  #deleteNotes {
    width: 25%;
  }
}

@media (max-width: 1000px) {
  .nav {
    width: 80vw;
  }
  #deleteNotes {
    width: 30%;
  }
}

@media (max-width: 750px) {
  .nav {
    width: 70vw;
  }
  .nav > .navItem {
    display: block;
    margin: auto;
    margin-bottom: 1rem;
    width: 100%;
  }

  .add-note {
    font-size: 1.5rem;
  }

  .card {
    font-size: 1.5rem;
    width: 70vw;
  }

  #deleteNotes {
    width: 45%;
  }
}

@media (max-width: 590px) {
  .add-note {
    display: block;
    margin: auto;
  }
}

@media (max-width: 500px) {
  #importBtn,
  #exportBtn,
  .navItem {
    width: 100% !important;
  }

  .paper {
    max-width: 50%;
  }

  #deleteNotes {
    width: 75%;
  }
}
Refresh the page again, and you will see the import/export section in all its splendor 😉. Now, let's hide it by uncommenting the first and only line from the .importExport class in our style.css file and poof it goes. But do not worry, we will now start working on the ui.js script to bring it all back.
We will start working on the ui.js file. First, let's make a little method that toggles the 3 'tabs' namely: input, diary entries and import/export section. We want each tab to show when we click on the button and we want to color the button that we click in a different way (so that it has an 'active') class. We will also add an event listener on the 3 main buttons and call the method to trigger the toggle. Here's the code for that. Add it in ui.js:
*remember that whenever you see the //put this on one line comment in the JavaScript code, it simply means that the next 2 lines should actually be on a single line. Your editor's auto formatting might do this by itself. The reason I split the code like this in the article snippets is so that it stays nicely visible on a mobile device too.
//buttons and inputs
const inputBtn = document.querySelector("#inputBtn");
const listBtn = document.querySelector("#recordsBtn");
//put this on one line
const importExportBtn = document.
                  querySelector("#importExportBtn");
const inputDiv = document.querySelector("#input");
//put this on one line
const entriesDiv = document
                    .querySelector(".diaryEntries");
//put this on one line
const importExportDiv = document
                    .querySelector(".importExport");

let activeColor = "#050D31";
let inactiveColor = "#2600FF";

//put this on one line
const toggleElement =
(toShow, toHide, activeC, inactiveC) => {
  toShow.map((i) => (i.style.display = "block"));
  toHide.map((i) => (i.style.display = "none"));
  //put this on one line
  activeC.map((i) =>
    (i.style.backgroundColor = activeColor));
  //put this on one line
  inactiveC.map((i) =>
    (i.style.backgroundColor = inactiveColor));
};

inputBtn.addEventListener("click", () => {
  toggleElement(
    [inputDiv],
    [entriesDiv, importExportDiv],
    [inputBtn],
    [listBtn, importExportBtn]
  );
});

listBtn.addEventListener("click", () => {
  toggleElement(
    [entriesDiv],
    [inputDiv, importExportDiv],
    [listBtn],
    [inputBtn, importExportBtn]
  );
});

importExportBtn.addEventListener("click", () => {
  toggleElement(
    [importExportDiv],
    [inputDiv, entriesDiv],
    [importExportBtn],
    [listBtn, inputBtn]
  );
});
Now when you click on whichever of the 3 main buttons (Input, Entries or Import/Export) the actual element shows up in the interface. Isn't that just cute? 😅
Let's now implement a little method for the color scheme changing too. Remember that we want that when we click on one of the 3 coloures circles, to change the color scheme of the app. Here's the code to add the method and we are also adding 3 event listeners (for the 3 color circles). Replace everything in ui.js with the code below:
//buttons and inputs
const inputBtn = document.querySelector("#inputBtn");
const listBtn = document.querySelector("#recordsBtn");
//put this on one line
const importExportBtn = document.
                  querySelector("#importExportBtn");
const inputDiv = document.querySelector("#input");
//put this on one line
const entriesDiv = document
                    .querySelector(".diaryEntries");

const uiText = document.querySelector(".uiText");
//put this on one line
const importExportDiv = document
                        .querySelector(".importExport");
//colors for UI customisation
const c1 = document.getElementById("c1");
const c2 = document.getElementById("c2");
const c3 = document.getElementById("c3");
const bodyBackground = document.querySelector("body");

let activeColor = "#050D31";
let inactiveColor = "#2600FF";


//change pannel/element function
//put this on one line
const toggleElement =
(toShow, toHide, activeC, inactiveC) => {
  toShow.map((i) => (i.style.display = "block"));
  toHide.map((i) => (i.style.display = "none"));
  //put this on one line
  activeC.map((i) =>
    (i.style.backgroundColor = activeColor));
  //put this on one line
  inactiveC.map((i) =>
    (i.style.backgroundColor = inactiveColor));
};


//change color theme function
const changeTheme = (c1, c2, c3, c4) => {
bodyBackground.style.backgroundColor = c1;
activeColor = c2;
inactiveColor = c3;
inputBtn.style.backgroundColor = inactiveColor;
recordsBtn.style.backgroundColor = inactiveColor;
importExportBtn.style.backgroundColor = inactiveColor;
importBtn.style.backgroundColor = inactiveColor;
exportBtn.style.backgroundColor = inactiveColor;
listBtn.style.border = `2px solid ${activeColor}`;
inputBtn.style.border = `2px solid ${activeColor}`;
importBtn.style.border = `2px solid ${activeColor}`;
exportBtn.style.border = `2px solid ${activeColor}`;
//put this on one line
importExportBtn.style.border =
  `2px solid ${activeColor}`;
uiText.style.border = `2px solid ${activeColor}`;
};


//event listener for toggling pannels
inputBtn.addEventListener("click", () => {
  toggleElement(
    [inputDiv],
    [entriesDiv, importExportDiv],
    [inputBtn],
    [listBtn, importExportBtn]
  );
});

listBtn.addEventListener("click", () => {
  toggleElement(
    [entriesDiv],
    [inputDiv, importExportDiv],
    [listBtn],
    [inputBtn, importExportBtn]
  );
});

importExportBtn.addEventListener("click", () => {
  toggleElement(
    [importExportDiv],
    [inputDiv, entriesDiv],
    [importExportBtn],
    [listBtn, inputBtn]
  );
});

//event listeners for changing theme
c1.addEventListener("click", () => {
  changeTheme("#6C8CE2", "#050D31", "#2600FF", "blue");
});
c2.addEventListener("click", () => {
  changeTheme("#fcce03", "#ad871d", "#ebb852", "yellow");
});
c3.addEventListener("click", () => {
  changeTheme("pink", "#97089e", "#f003fc", "pink");
});
We have implemented the 'themes changing' feature. The toggleElement() method hides and shows elements depending on what we need, and the changeTheme() method changes the color scheme (borders and backgrounds) for the app. As a last step before we finish with the ui.js script, we will also make the application 'remember' what was last clicked, what is 'active' and what color was picked by the user. Note that it currently cannot do that, if we refresh the page, it loses all state and hides everything. This is how we will manage state in our application. State is a concept which basically refers to the data an application has 'in memory' and on which the application's looks and what it can do at a certain point in time are based (for instance if we click the yellow circle, the app turns yellow, this is its state at that point in time, and if we refresh the page, we lose that state ). It is also fairly hard to manage (for our application it's not such a big deal, given the low level of complexity of our notes app, but the more complex an application becomes, the harder it gets to keep the state well structured and organised).
We will make it so that the application 'remembers' the last toggled section and the last color theme selected, even after refresh/closing the app. We are going to use the localStorage API for this. It will allow us to store data on the client (so on the user's computer) and retrieve it to keep the UI in sync with his options.
The methods that we will use with localStorage are setItem() and getItem(). We will also use removeItem(). If our variables change at runtime (so while the script executes, because the user clicks on stuff for instance), and then we refresh the page, we lose what the user did. On the other hand with localStorage we can do something like:
let user = "user1";
//user1 makes a purchase in our app and logs out
//user2 logs in
user = "user2";
//if when script starts I need to know 'who' is user
//I have to use localStorage or some cookie
//now I 'remember' which user I have
localStorage.setItem("user", user);
If my example above is not clear about how it works, just copy the below line and paste it in your JS console in the browser and hit enter:
localStorage.setItem("testVariable", "some data..");
Next, if you go to the Application tab in the console and select the Local Storage 'Storage' option, you will see:
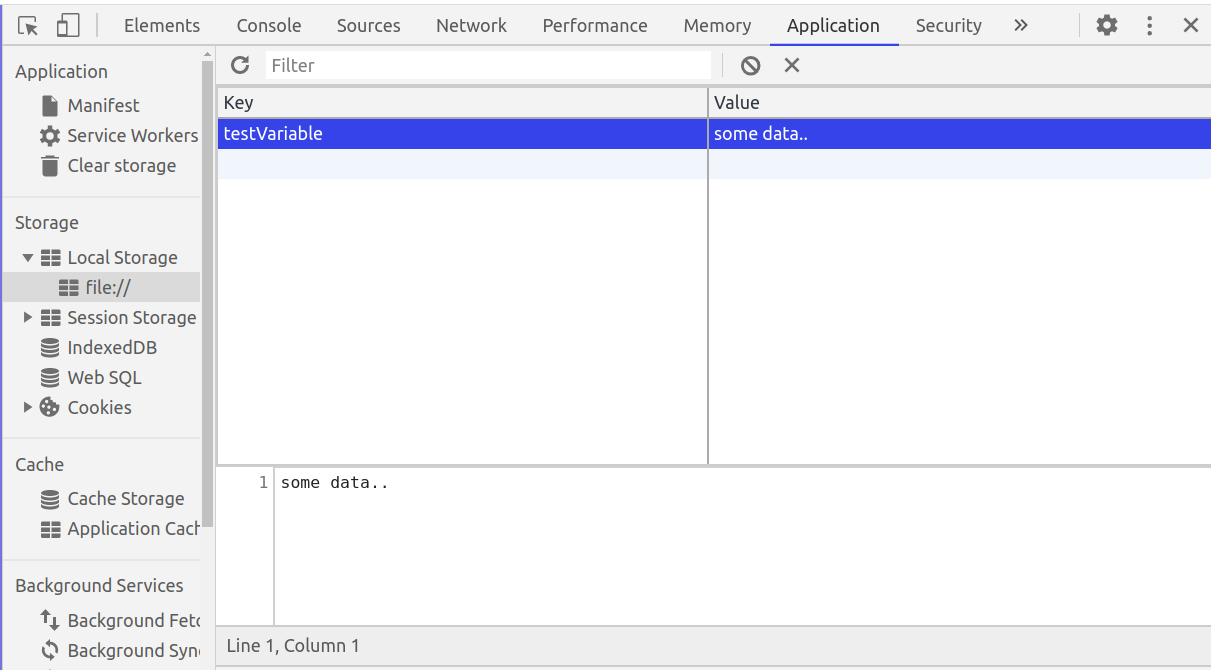
So the variable testVariable having the value "some data.." has been stored onto localStorage and our JS application can retrieve it, modify it, remove it, use it any way we need.
Now that you understood a bit how localStorage works, we can implement the logic that 'remembers' what tab the user clicked and what colo scheme he chose. Replace everything in ui.js with the below code:
//buttons and inputs
const inputBtn = document.querySelector("#inputBtn");
const listBtn = document.querySelector("#recordsBtn");
//put this on one line
const importExportBtn = document.
                  querySelector("#importExportBtn");
const inputDiv = document.querySelector("#input");
//put this on one line
const entriesDiv = document
                    .querySelector(".diaryEntries");

const uiText = document.querySelector(".uiText");
//put this on one line
const importExportDiv = document
                        .querySelector(".importExport");
//colors for UI customisation
const c1 = document.getElementById("c1");
const c2 = document.getElementById("c2");
const c3 = document.getElementById("c3");
const bodyBackground = document.querySelector("body");

//grab theme and active btn from localStorage
let theme = localStorage.getItem("theme");
let activeBtn = localStorage.getItem("activeBtn");

let activeColor = "#050D31";
let inactiveColor = "#2600FF";


//change pannel/element function
//put this on one line
const toggleElement =
(toShow, toHide, activeC, inactiveC) => {
  toShow.map((i) => (i.style.display = "block"));
  toHide.map((i) => (i.style.display = "none"));
  //put this on one line
  activeC.map((i) =>
    (i.style.backgroundColor = activeColor));
  //put this on one line
  inactiveC.map((i) =>
    (i.style.backgroundColor = inactiveColor));
};


//change color theme function
const changeTheme = (c1, c2, c3, c4) => {
bodyBackground.style.backgroundColor = c1;
activeColor = c2;
inactiveColor = c3;
inputBtn.style.backgroundColor = inactiveColor;
recordsBtn.style.backgroundColor = inactiveColor;
importExportBtn.style.backgroundColor = inactiveColor;
importBtn.style.backgroundColor = inactiveColor;
exportBtn.style.backgroundColor = inactiveColor;
listBtn.style.border = `2px solid ${activeColor}`;
inputBtn.style.border = `2px solid ${activeColor}`;
importBtn.style.border = `2px solid ${activeColor}`;
exportBtn.style.border = `2px solid ${activeColor}`;
//put this on one line
importExportBtn.style.border =
  `2px solid ${activeColor}`;
uiText.style.border = `2px solid ${activeColor}`;

let activeBtn = localStorage.getItem("activeBtn");
//apply active class on button while changing color
switch (activeBtn) {
  case "entries":
    listBtn.style.backgroundColor = activeColor;
    break;
  case "importExport":
    importExportBtn.style.backgroundColor = activeColor;
    break;
  case "input":
    inputBtn.style.backgroundColor = activeColor;
    break;
}
};

//keep track of UI theme and update
if (theme === "blue") {
changeTheme("#6C8CE2", "#050D31", "#2600FF", "blue");
} else if (theme === "yellow") {
changeTheme("#fcce03", "#ad871d", "#ebb852", "yellow");
} else if (theme === "pink") {
changeTheme("pink", "#97089e", "#f003fc", "pink");
}


//event listener for toggling pannels
inputBtn.addEventListener("click", () => {
  toggleElement(
    [inputDiv],
    [entriesDiv, importExportDiv],
    [inputBtn],
    [listBtn, importExportBtn]
  );
  //set active btn to localStorage so app remembers it
  localStorage.setItem("activeBtn", "input");
});

listBtn.addEventListener("click", () => {
  toggleElement(
    [entriesDiv],
    [inputDiv, importExportDiv],
    [listBtn],
    [inputBtn, importExportBtn]
  );
  //set active btn to localStorage so app remembers it
  localStorage.setItem("activeBtn", "entries");
});

importExportBtn.addEventListener("click", () => {
  toggleElement(
    [importExportDiv],
    [inputDiv, entriesDiv],
    [importExportBtn],
    [listBtn, inputBtn]
  );
  //set active btn to localStorage so app remembers it
  localStorage.setItem("activeBtn", "importExport");
});

//event listeners for changing theme
c1.addEventListener("click", () => {
changeTheme("#6C8CE2", "#050D31", "#2600FF", "blue");
//set theme to localStorage so app remembers it
  localStorage.setItem("theme", "blue");
});
c2.addEventListener("click", () => {
changeTheme("#fcce03", "#ad871d", "#ebb852", "yellow");
//set theme to localStorage so app remembers it
  localStorage.setItem("theme", "yellow");
});
c3.addEventListener("click", () => {
changeTheme("pink", "#97089e", "#f003fc", "pink");
//set theme to localStorage so app remembers it
  localStorage.setItem("theme", "pink");
});


//keep track of active tab and show the one last clicked
if (activeBtn === "input") {
  toggleElement(
    [inputDiv],
    [entriesDiv, importExportDiv],
    [inputBtn],
    [listBtn, importExportBtn]
  );
} else if (activeBtn === "entries") {
  toggleElement(
    [entriesDiv],
    [inputDiv, importExportDiv],
    [listBtn],
    [inputBtn, importExportBtn]
  );
} else if (activeBtn === "importExport") {
  toggleElement(
    [importExportDiv],
    [inputDiv, entriesDiv],
    [importExportBtn],
    [listBtn, inputBtn]
  );
}
Test the UI thus far. The application now remembers what last tab we clicked and what color scheme we choose. We are pretty much done with the UI.We will only add one more method into the ui.js script for the alert functionality (we want our app to display fancy alerts when stuff happens). Just paste it at the end of the file:
          /*
 * Alert Functionality
 */
const showAlert = (msg) => {
  //alert functionality
  const alert = document.querySelector(".alert");
  alert.style.display = "block";
  alert.className = "alert uiText";
  alert.innerHTML = msg;

  setTimeout(() => {
    alert.innerHTML = "";
    alert.style.display = "none";
  }, 2000);
};
Next we will work on the second script of our application notes.js, which will perform the 'back-end' logic of storing the notes (you've guessed it!😉 in localStorage), importing and exporting them as a JSON file.
'back-end' logic with notes.js
We will now start working on the notes.js script which will perform our 'back-end' logic. The script is not a real back-end but you will see that it mimmicks one very well (well enough so you get familiar with how real back-end scripts work). I consider this approach to be ideal as a transition towards more advanced, full-stack applications with a 'real' backend.
Either way, enough with the talk. Let's start by implementing a method to add a note in the notes.js file:
let notes;

if (localStorage.getItem("notes") === null) {
  notes = [];
} else {
  notes = JSON.parse(localStorage.getItem("notes"));
}

/*
  * Grabs user note and saves to localStorage API
  */
const grabNote = (e) => {
  const note = {};
  //regexp to 'know' how to put linebreaks
  let noteText = document.querySelector("#note").value;
  note.text = noteText.replace(/\r?\n/g, "<br />");
  const noteDate = new Date()
    .toString()
  .replace(/\S+\s(\S+)\s(\d+)\s(\d+)\s.*/, "$2-$1-$3");
  note.date = noteDate;
  let id =
    Math.random().toString(12).substring(2, 17) +
    Math.random().toString(12).substring(2, 17);
  note.id = id;
  notes.unshift(note);
  localStorage.setItem("notes", JSON.stringify(notes));
  document.querySelector("#note").value = "";

  //alert functionality
  showAlert("Note Saved 😉");
};

let saveBtn = document.querySelector(".add-note");
saveBtn.addEventListener("click", grabNote);
Now if we add a note, we cannot see it yet (we will add this functionality right now) but if we go to the Application tab, to LocalStorage we can see that we have it:
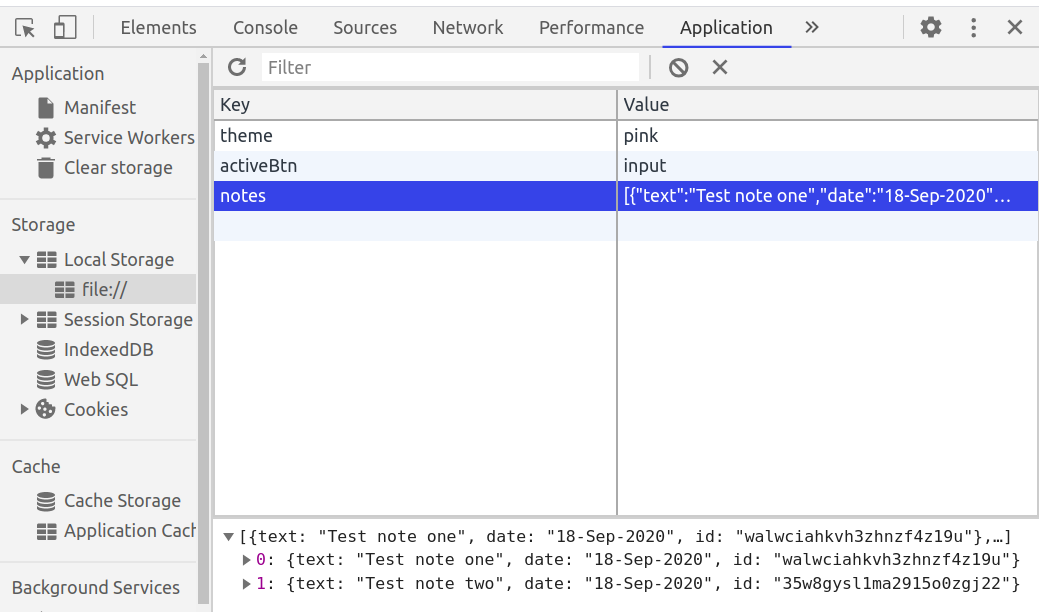
Let's now add the logic that displays the notes that we already have in local storage.Add the below code to notes.js right above the grabNote() method:
/*
 * Grabs notes from localStorage API and displays to UI
 */
const displayNotes = () => {
  let records = document.querySelector("#records");
  let output = "<div class='first-card'></div>";
  notes.map((n) => {
    output += `
        <div class="card">
            <p class="text">
                ${n.text}
            </p>
            <p class="text">
                Written at: ${n.date}
            </p>
            <p class="text invisible">
                id: ${n.id}
            </p>
            <i
              class="fa fa-pencil pencil-note"
              aria-hidden="true"></i>
            <span
              id="saveEdit"></span>
                <i
                    class="fa fa-times-circle"
                    aria-hidden="true"
                ></i>
            <hr>
        </div>
      `;
  });
  records.innerHTML = output;
};
//call display notes to see the notes
displayNotes();
Now, we can add notes and we can see them. The downside is that we cannot see them immediately, we have to refresh the page first. That is bad, for the UX, the user will want to see his/her note right when they type it.
In order to fix our UI bug (and see the notes displayed into the DOM right when the user adds them) is to simply call the displayNotes() method once more right after adding the note. Replace the grabNote() method as per below:
/*
 * Grabs note and saves to localStorage API
 */
const grabNote = (e) => {
const note = {};
//regexp to 'know' how to put linebreaks
let noteText = document.querySelector("#note").value;
note.text = noteText.replace(/\r?\n/g, "<br />");
const noteDate = new Date()
  .toString()
  .replace(/\S+\s(\S+)\s(\d+)\s(\d+)\s.*/, "$2-$1-$3");
note.date = noteDate;
let id =
  Math.random().toString(36).substring(2, 15) +
  Math.random().toString(36).substring(2, 15);
note.id = id;
notes.unshift(note);
localStorage.setItem("notes", JSON.stringify(notes));
document.querySelector("#note").value = "";

//call displayNotes & 'refresh' the notes after each add
displayNotes();

//alert functionality
showAlert("Note Saved 😉");
};
Now, when we add a note, it shows into the DOM immediately.
Now that we can add notes to the DOM and we can see them displayed, let's add the filter functionality quickly. Note that the input with the class .filter already has an oninput attribute which calls the filter() method. However, it currently throws an error in the console if we type something in it. As it should since the filter method does not exist. Let's add it in the notes.js file. Add the below code at the end of the file:
/*
* filter notes functionality
*/
const filterField = document.querySelector(".filter");
//put this on one line
filterField.addEventListener("click",
  () => (filterField.value = ""));

const filter = () => {
  //filter by title,  date
document.querySelectorAll(".card").forEach((item) => {
  let value = document.querySelector(".filter")
                          .value.toLowerCase();

  const note = item.children[0].innerText;
  const date = item.children[1].innerText;

  if (
    note.toLowerCase().indexOf(value) != -1 ||
    date.toLowerCase().indexOf(value) != -1
  ) {
    item.style.display = "block";
  } else {
    item.style.display = "none";
  }
});
};
We now have filter functionality too. Test it out to see how it works. Next, let's add the edit and delete methods. We will start with the edit. Note that each note has a little pencil icon. That's what we'll use to hook our little function that will allow us to edit the note. As for 'knowing' which note to edit in the localStorage array of notes, also do note (if you haven't already) that each note has a hidden paragraph in it, with the class .invisible added to the .text one, which holds an ID. That's what we'll use to search for the specific note to edit in memory and in localStorage too. Go to the notes.js file and add the edit functionality. However, do put it inside the displayNotes() method (both the edit method and the event binding for it). We do this so we can call the displayNotes() method multiple times and we need to re-attach the edit events to all notes (old ones and new ones 'freshly added into the DOM'). Now the displayNotes() method looks like this:
/*
* Grabs notes from localStorage API and displays to UI
*/
const displayNotes = () => {
  let records = document.querySelector("#records");
  let output = "";
  notes.map((n) => {
    output += `
        <div class="card">
            <p class="text">
                ${n.text}
            </p>
            <p class="text">
                Written at: ${n.date}
            </p>
            <p class="text invisible">
                id: ${n.id}
            </p>
            <i
              class="fa fa-pencil pencil-note"
              aria-hidden="true"></i>
            <span
              id="saveEdit"></span>
                <i
                    class="fa fa-times-circle"
                    aria-hidden="true"
                ></i>
            <hr>
        </div>
      `;
  });
  records.innerHTML = output;

  //select 'all' edit buttons (not just 1)
  //put this on one line
  const editBtns = Array.from(document
                .querySelectorAll(".pencil-note"));

  /*
  * Allows note editing
  */
  const editNote = (e) => {
    let idToEdit = e.target.parentElement.childNodes[5]
      .innerText
      .trim()
      .split(":")[1]
      .trim();
    let cardToEdit = e.target.parentElement
                    .childNodes[1];
    cardToEdit.contentEditable = "true";
    cardToEdit.style.backgroundColor = "#fff";
    cardToEdit.style.padding = "1.5rem";
    const editIcon = e.target.parentElement
                      .childNodes[9];
    editIcon.style.display = "inline-block";
    editIcon.innerHTML = `
      <i class="fa fa-check" aria-hidden="true"></i>`;
    e.preventDefault();
  };

  //bind the event to all edit buttons
  editBtns.map((i) => {
    i.addEventListener("click", editNote);
  });
};
//call display notes to see the notes
displayNotes();
Now, if we click on the pen icon, the edit interface pops up and the contentEditable property of the paragraph becomes true (so the user can 'edit' the note). Please note how we used the querySelectorAll() method to select all the pen icons and how we have turned the NodeList object that it returns into an array. We did that so we can use the nice map() higher order function to bind the event on all pen buttons. However, we need to be able to save the note too. So let's just add that functionality. Add the below to notes.js still inside the displayNotes() method, right under editNote():
/*
 * saves note after edit
 */
const saveNote = (e) => {
  let newText = e.target.parentElement.parentElement
    .childNodes[1].innerText
    .trim()
    .replace(/\r?\n/g, "<br />");
  let newDate = new Date()
    .toString()
  .replace(/\S+\s(\S+)\s(\d+)\s(\d+)\s.*/, "$2-$1-$3");
  let idToEdit = e.target.parentElement.parentElement
    .childNodes[5].innerText
    .trim()
    .split(":")[1]
    .trim();

  let newResource = {
    text: newText,
    date: newDate,
    id: idToEdit,
  };

  notes.map((n, index) => {
    if (n.id === idToEdit) {
      notes[index] = newResource;
    }
  });

  localStorage.setItem("notes",
        JSON.stringify(notes
      ));

  let cardToEdit = e.target.parentElement.parentElement
                  .childNodes[1];
  cardToEdit.contentEditable = "false";
  cardToEdit.style.backgroundColor = "#f0edd9";
  cardToEdit.style.padding = "0";
  const editIcon = e.target.parentElement.parentElement
                  .childNodes[9];
  editIcon.style.display = "none";
};

const saveIcon = Array.from(document
        .querySelectorAll("#saveEdit"));

saveIcon.map((i) => {
  i.addEventListener("click", saveNote);
});
For the save method, we use the same tricks as for the edit one. We select all the save icons (the little tick icon), we convert the NodeList into an array and map through it to attach the event to each button. Inside the save function we basically make the contentEditable property back to false, so the user can't edit the note anymore, we set the new date and the new text to the note, we keep the ID, and we save the note. In the save() method we use the nice map() method to also loop quick through all notes and find ours to save after edit. As you will work with JavaScript more, you will come to better understand how useful higher order functions such as map() are. The last 'new trick' we used in the save method (we use it in edit too but I am explaining it now for the first time), is selecting DOM (remember what that was right?) nodes using the .childNodes property (and we also used .children for the filter() method).
Finally, let's go on to implement the delete() method. It will not have anything special (nothing different from what we have been using so far for the edit() and save() methods). Add it to the notes.js inside the displayNotes() method just as you did for the edit and save methods. Now the display method looks like this:
/*
* Grabs notes from localStorage API and displays to UI
*/
const displayNotes = () => {
  let records = document.querySelector("#records");
  let output = "";
  notes.map((n) => {
    output += `
          <div class="card">
              <p class="text">
                  ${n.text}
              </p>
              <p class="text">
                  Written at: ${n.date}
              </p>
              <p class="text invisible">
                  id: ${n.id}
              </p>
              <i
                class="fa fa-pencil pencil-note"
                aria-hidden="true"></i>
              <span
                id="saveEdit"></span>
                  <i
                      class="fa fa-times-circle"
                      aria-hidden="true"
                  ></i>
              <hr>
          </div>
        `;
  });
  records.innerHTML = output;

  //select 'all' edit buttons (not just 1)
  //put this on one line
  const editBtns = Array
        .from(document.querySelectorAll(".pencil-note"));

  /*
  * Allows note editing
  */
  const editNote = (e) => {
    let idToEdit = e.target.parentElement.childNodes[5]
      .innerText
      .trim()
      .split(":")[1]
      .trim();
    let cardToEdit = e.target.parentElement.childNodes[1];
    cardToEdit.contentEditable = "true";
    cardToEdit.style.backgroundColor = "#fff";
    cardToEdit.style.padding = "1.5rem";
    const editIcon = e.target.parentElement.childNodes[9];
    editIcon.style.display = "inline-block";
    editIcon.innerHTML = `
        <i class="fa fa-check" aria-hidden="true"></i>`;
    e.preventDefault();
  };

  //bind the event to all edit buttons
  editBtns.map((i) => {
    i.addEventListener("click", editNote);
  });

  /*
  * saves note after edit
  */
  const saveNote = (e) => {
    let newText = e.target
      .parentElement
      .parentElement
      .childNodes[1]
      .innerText
      .trim()
      .replace(/\r?\n/g, "<br />");
    let newDate = new Date()
      .toString()
      .replace(/\S+\s(\S+)\s(\d+)\s(\d+)\s.*/, "$2-$1-$3");
    let idToEdit = e.target
      .parentElement
      .parentElement
      .childNodes[5]
      .innerText
      .trim()
      .split(":")[1]
      .trim();

    let newResource = {
      text: newText,
      date: newDate,
      id: idToEdit,
    };

    notes.map((n, index) => {
      if (n.id === idToEdit) {
        notes[index] = newResource;
      }
    });

    localStorage.setItem("notes", JSON.stringify(notes));

    let cardToEdit = e.target.parentElement
         .parentElement.childNodes[1];
    cardToEdit.contentEditable = "false";
    cardToEdit.style.backgroundColor = "#f0edd9";
    cardToEdit.style.padding = "0";
    const editIcon = e.target
      .parentElement.parentElement.childNodes[9];
    editIcon.style.display = "none";
  };

  const saveIcon = Array
   .from(document.querySelectorAll("#saveEdit"));

  saveIcon.map((i) => {
    i.addEventListener("click", saveNote);
  });

  /*
 * Deletes a note
 */
const deleteNote = (e) => {
  let idToDelete = e.target
    .parentElement.childNodes[5]
    .innerText
    .split(":")[1]
    .trim();
  notes.map((n, index) => {
    if (n.id === idToDelete) {
      notes.splice(index, 1);
    }
  });
  localStorage.setItem("notes", JSON.stringify(notes));
  e.target.parentElement.style.display = "none";
};
//event listener for delete
let deleteBtns = Array.from(document.
    querySelectorAll(".fa-times-circle"));
deleteBtns.map((b) => {
  b.addEventListener("click", deleteNote);
});
};
The reason we have put the edit and delete methods inside displayNotes() and their event bindings, is because we are calling it multiple times (more precisely each time we add a new note). This means that we need to attach an event listener for edit/save/delete for the new notes but also to re-attach the ones for the existing notes. This happens because displayNotes() simply 'rebuilds' the notes into the DOM so the original event listeners are lost. Note that now, we have delete functionality too. So we have full CRUD functionality for our notes. The only method left to implement is deleteNotes() which will delete all the notes at once. Add it to the notes.js file right at the end:
/*
 * Delete all notes
 */
const deleteAllBtn = document
  .querySelector("#deleteNotes");

const deleteNotes = () => {
  deleteAllBtn.style.backgroundColor = "red";
  deleteAllBtn.style.border = "2px solid black";
  //empty notes array
  notes = [];
  localStorage.removeItem("notes");
  document.querySelector("#records").innerHTML = "";
  const cardsToDelete = Array
  .from(document.querySelectorAll(".card"));
  cardsToDelete.map((i) => (i.style.display = "none"));
};
deleteAllBtn.addEventListener("click", deleteNotes);
The last functionalities we want to add for our application are the import() and export() ones. We want the user to be able to export their notes as a .JSON file. Further more, we want them to be able to import notes too. Let's start with the export() method. Add it to the notes.js file:
/*
 * Export  notes as JSON
 */
const exportBTN = document.querySelector("#exportBtn");
const importBTN = document.querySelector("#importBtn");

const exportNotes = () => {
  exportBTN.style.backgroundColor = activeColor;
  importBTN.style.backgroundColor = inactiveColor;

  let notesObj = {
    notes,
  };
let exportDate = new Date()
  .toString()
  .replace(/\S+\s(\S+)\s(\d+)\s(\d+)\s.*/, "$2-$1-$3");
  var a = document.createElement("a");
  document.body.appendChild(a);
  a.style = "display: none";
  var json = JSON.stringify(notesObj),
    blob = new Blob([json], { type: "octet/stream" }),
    url = window.URL.createObjectURL(blob);
  a.href = url;
  a.download = `myNotes-${exportDate}.json`;
  a.click();
  window.URL.revokeObjectURL(url);
};

exportBtn.addEventListener("click", exportNotes);
Now write some notes, and then test the export functionality. See how the JSON file looks like. Next, let's add the import() method to notes.js:
/*
 * Import JSON with  notes
 */
 const importNotes = (e) => {
  importBTN.style.backgroundColor = activeColor;
  exportBTN.style.backgroundColor = inactiveColor;

  document.getElementById("file").addEventListener(
    "change",
    (evt) => {
      var files = evt.target.files;
      var file = files[0];
      var reader = new FileReader();
      reader.onload = function (event) {
        let newNotes = JSON
          .parse(event.target.result).notes;
        newNotes.map((i) => notes.unshift(i));
        localStorage.setItem(
            "notes",
            JSON.stringify(notes));

        const alert = document.querySelector(".alert");
        alert.style.display = "block";
        alert.className = "alert uiText";
  alert.innerHTML = "Notes imported Successfully 😉";
        setTimeout(() => {
          alert.innerHTML = "";
          alert.style.display = "none";
        }, 2000);
        displayNotes();
      };
      let readValue = reader.readAsText(file);
    },
    false
  );
};
importBtn.addEventListener("click", importNotes);
For the import method, we use the < input type="file" />
'type' of input. It will allow us to read a file on the user's computer and load it in our application.
Try importing the below JSON file in the application:
Download notes JSON file.
Before wrapping things up, we will do quick just a tiny little refactor onto the displayNotes() method. As it is now, it looks like some humonguous monolithic method that does more things than it should as we crammed logic into it. It seems we've made a mistake with setting it up so that it includes the edit, save and delete methods too. In order to decouple it properly, we will attach the event bindings for the 3 methods onto each note right when we are creating it. So for now just cut the 3 methods (edit, save and delete) from inside the displayNotes() and paste them above (only the methods, not the event bindings onto the buttons), so for now the method will look like this:
/*
 * Grabs notes from localStorage
 * API and displays them to UI
 */
const displayNotes = () => {
  let records = document.querySelector('#records');
  let output = '';

  notes.map((n) => {
  output += `
    <div class="card">
        <p class="text">
            ${n.text}
        </p>
        <p class="text">
            Written at: ${n.date}
        </p>
        <p class="text invisible">
            id: ${n.id}
        </p>
        <i
          onclick="editNote(event)"
          class="fa fa-pencil pencil-note"
          aria-hidden="true"></i>
        <span id="saveEdit">
          </span>
            <i
              onclick="deleteNote(event)"
              class="fa fa-times-circle"
              aria-hidden="true"></i>
        <hr>
    </div>
      `;
  });

records.innerHTML = output;

//atach event listeners for edit/delete notes
//const editBtns = Array
//.from(document.querySelectorAll('.pencil-note'));

// editBtns.map((i) => {
//   i.addEventListener('click', editNote);
// });

// const saveIcon = Array
//  .from(document.querySelectorAll('#saveEdit'));

// saveIcon.map((i) => {
//   i.addEventListener('click', saveNote);
// });

// let deleteBtns = Array
//  .from(document.querySelectorAll('.fa-times-circle'));
// deleteBtns.map((b) => {
//   b.addEventListener('click', deleteNote);
// });
};
Note how we are using the onclick attribute to set up events for our delete and edit methods. Now, we need only to modify the edit method:
        /*
 * Allows note editing
 */
const editNote = (e) => {
  let idToEdit;

  if (e.target.parentElement
   .childNodes[5].innerText !== undefined) {

    idToEdit = e.target
      .parentElement
      .childNodes[5]
      .innerText
      .trim()
      .split(':')[1]
      .trim();
  }

  let cardToEdit = e.target.parentElement.childNodes[1];
  cardToEdit.contentEditable = 'true';
  cardToEdit.style.backgroundColor = '#fff';
  cardToEdit.style.padding = '1.5rem';
  const editIcon = e.target.parentElement.childNodes[9];
  editIcon.style.display = 'inline-block';
  editIcon.innerHTML = `
  <i
    onclick="saveNote(event)"
    class="fa fa-check"
    aria-hidden="true">
  </i>`;
  e.preventDefault();
};
*Note how we added the onclick attribute onto the fa-check icon. Now the whole notes.js file looks like this:
let notes;

if (localStorage.getItem('notes') === null) {
  notes = [];
} else {
  notes = JSON.parse(localStorage.getItem('notes'));
}

/*
 * Deletes a note
 */
const deleteNote = (e) => {
  let idToDelete = e.target.parentElement
    .childNodes[5].innerText
    .split(':')[1]
    .trim();
  notes.map((n, index) => {
    if (n.id === idToDelete) {
      notes.splice(index, 1);
    }
  });
  localStorage.setItem('notes', JSON.stringify(notes));
  e.target.parentElement.style.display = 'none';
};

/*
 * saves note after edit
 */
const saveNote = (e) => {
  let newText = e.target.parentElement
    .parentElement.childNodes[1].innerText
    .trim()
    .replace(/\r?\n/g, '<br />');
  let newDate = new Date()
    .toString()
    .replace(/\S+\s(\S+)\s(\d+)\s(\d+)\s.*/, '$2-$1-$3');
  let idToEdit = e.target.parentElement.parentElement
    .childNodes[5]
    .innerText
    .trim()
    .split(':')[1]
    .trim();

  let newResource = {
    text: newText,
    date: newDate,
    id: idToEdit,
  };

  notes.map((n, index) => {
    if (n.id === idToEdit) {
      notes[index] = newResource;
    }
  });

  localStorage.setItem('notes', JSON.stringify(notes));

  let cardToEdit = e.target.parentElement
    .parentElement.childNodes[1];
  cardToEdit.contentEditable = 'false';
  cardToEdit.style.backgroundColor = '#f0edd9';
  cardToEdit.style.padding = '0';
  const editIcon = e.target.parentElement
     .parentElement.childNodes[9];
  editIcon.style.display = 'none';
};

/*
 * Allows note editing
 */
const editNote = (e) => {
  let idToEdit;

  if (e.target.parentElement.childNodes[5]
    .innerText !== undefined) {
    idToEdit = e.target.parentElement
      .childNodes[5].innerText
      .trim()
      .split(':')[1]
      .trim();
  }

  let cardToEdit = e.target.parentElement.childNodes[1];
  cardToEdit.contentEditable = 'true';
  cardToEdit.style.backgroundColor = '#fff';
  cardToEdit.style.padding = '1.5rem';
  const editIcon = e.target.parentElement.childNodes[9];
  editIcon.style.display = 'inline-block';
  editIcon.innerHTML = `
  <i
    onclick="saveNote(event)"
    class="fa fa-check"
    aria-hidden="true">
  </i>`;
  e.preventDefault();
};

/*
 * Grabs notes from localStorage
 * API and displays them to UI
 */
const displayNotes = () => {
  let records = document.querySelector('#records');
  let output = '';

  notes.map((n) => {
    output += `
        <div class="card">
            <p class="text">
                ${n.text}
            </p>
            <p class="text">
                Written at: ${n.date}
            </p>
            <p class="text invisible">
                id: ${n.id}
            </p>
            <i
              onclick="editNote(event)"
              class="fa fa-pencil pencil-note"
              aria-hidden="true"></i>
            <span id="saveEdit">
              </span>
                <i
                  onclick="deleteNote(event)"
                  class="fa fa-times-circle"
                  aria-hidden="true"></i>
            <hr>
        </div>
      `;
  });

  records.innerHTML = output;

  //atach event listeners for edit/delete notes
  //const editBtns = Array
  //.from(document.querySelectorAll('.pencil-note'));

  // editBtns.map((i) => {
  //   i.addEventListener('click', editNote);
  // });

  // const saveIcon = Array
  //.from(document.querySelectorAll('#saveEdit'));

  // saveIcon.map((i) => {
  //   i.addEventListener('click', saveNote);
  // });

  // let deleteBtns = Array
  //.from(document.querySelectorAll('.fa-times-circle'));
  // deleteBtns.map((b) => {
  //   b.addEventListener('click', deleteNote);
  // });
};

//call display notes to see the notes
displayNotes();

const filterField = document
  .querySelector('.filter');
filterField.addEventListener('click',
  () => (filterField.value = '')
);

const filter = () => {
  //filter by title,  date
  document.querySelectorAll('.card').forEach((item) => {
    let value = document
     .querySelector('.filter').value.toLowerCase();

    const note = item.children[0].innerText;
    const date = item.children[1].innerText;

    if (
      note.toLowerCase().indexOf(value) != -1 ||
      date.toLowerCase().indexOf(value) != -1
    ) {
      item.style.display = 'block';
    } else {
      item.style.display = 'none';
    }
  });
};

/*
 * Delete all notes
 */
const deleteAllBtn = document.querySelector('#deleteNotes');
const deleteNotes = () => {
  deleteAllBtn.style.backgroundColor = 'red';
  deleteAllBtn.style.border = '2px solid black';
  notes = [];
  localStorage.removeItem('notes');
  document.querySelector('#records').innerHTML = '';
  showAlert('Notes deleted Successfully 😉');
};
deleteAllBtn.addEventListener('click', deleteNotes);

/*
 * Grabs user note and saves to localStorage API
 */
const grabNote = (e) => {
  const note = {};
  //regexp to 'know' how to put linebreaks
  let noteText = document.querySelector('#note').value;
  note.text = noteText.replace(/\r?\n/g, '<br />');
  const noteDate = new Date()
    .toString()
    .replace(/\S+\s(\S+)\s(\d+)\s(\d+)\s.*/, '$2-$1-$3');
  note.date = noteDate;
  let id =
    Math.random().toString(12).substring(2, 17) +
    Math.random().toString(12).substring(2, 17);
  note.id = id;
  notes.unshift(note);
  localStorage.setItem('notes', JSON.stringify(notes));
  document.querySelector('#note').value = '';

  displayNotes();

  //alert functionality
  showAlert('Note Saved 😉');
};

let saveBtn = document.querySelector('.add-note');
saveBtn.addEventListener('click', grabNote);

/*
 * Export  notes as JSON
 */
const exportBTN = document.querySelector('#exportBtn');
const importBTN = document.querySelector('#importBtn');

const exportNotes = () => {
  exportBTN.style.backgroundColor = activeColor;
  importBTN.style.backgroundColor = inactiveColor;

  let notesObj = {
    notes,
  };
  let exportDate = new Date()
    .toString()
    .replace(/\S+\s(\S+)\s(\d+)\s(\d+)\s.*/, '$2-$1-$3');
  var a = document.createElement('a');
  document.body.appendChild(a);
  a.style = 'display: none';
  var json = JSON.stringify(notesObj),
    blob = new Blob([json], { type: 'octet/stream' }),
    url = window.URL.createObjectURL(blob);
  a.href = url;
  a.download = `myNotes-${exportDate}.json`;
  a.click();
  window.URL.revokeObjectURL(url);
};

exportBtn.addEventListener('click', exportNotes);

/*
 * Import JSON with  notes
 */
const importNotes = (e) => {
  importBTN.style.backgroundColor = activeColor;
  exportBTN.style.backgroundColor = inactiveColor;

  document.getElementById('file').addEventListener(
    'change',
    (evt) => {
      var files = evt.target.files;
      var file = files[0];
      var reader = new FileReader();
      reader.onload = function (event) {
        let newNotes = JSON.parse(event.target.result).notes;
        newNotes.map((i) => notes.unshift(i));
        localStorage.setItem('notes', JSON.stringify(notes));

        showAlert('Notes imported Successfully 😉');
        displayNotes();
      };
      let readValue = reader.readAsText(file);
    },
    false
  );
};
importBtn.addEventListener('click', importNotes);
Now our application is complete. It works just as the initial version you have been testing at the beginning of this article. We have even refactored it and decoupled some functionality. The next projects we will build will have a real back-end, and not only use files written in localStorage. I do hope you have enjoyed working on this little project and I thank you a lot for sticking with me until the very end.